Building a Multi-language Blog with Strapi and Astro
Published on July 2, 2024
This article is a tutorial on how to build a multi-language blog using Strapi and Astro, a web framework for content sites. This enables you to expand your blog’s reach globally across multiple languages.
Readers respond much more positively when you speak to them in their own language. It enables a much closer connection compared to making them read something in a foreign language. If your blog targets non-English speakers, it is therefore important to communicate with them in their own language.
We will show you how to achieve this from a technical standpoint. For this, we’ll use Astro’s integrated Internationalization functionality and Strapi’s content infrastructure. This will allow features like automatic detection of the reader’s language and seamless switching between languages. Furthermore, we’ll make use of Astro’s static generation functionality to build a blog that meets the highest performance standards so you can climb the SEO rankings.
So let’s get started!
Introducing the Tech Stack: Astro, Strapi, and Tailwind
Astro will render the content, and styling will be done with Tailwind CSS, which has special support for internationalization and static generation.
The content will live in Strapi’s powerful CMS.
Requirements
All you need for this project is to have at least Node.js Version 18 installed on your computer and accessible to the terminal.
Enter the following command into your terminal to check:
$ node --version
v20.11.0
Setting up Strapi
First, we’ll need to set up Strapi. Run the command below in your terminal to set up a new Strapi project:
npx create-strapi-app@latest multi-lang-blog
Select the Quickstart (recommended) option since we won’t have to customize the installation process for this tutorial.
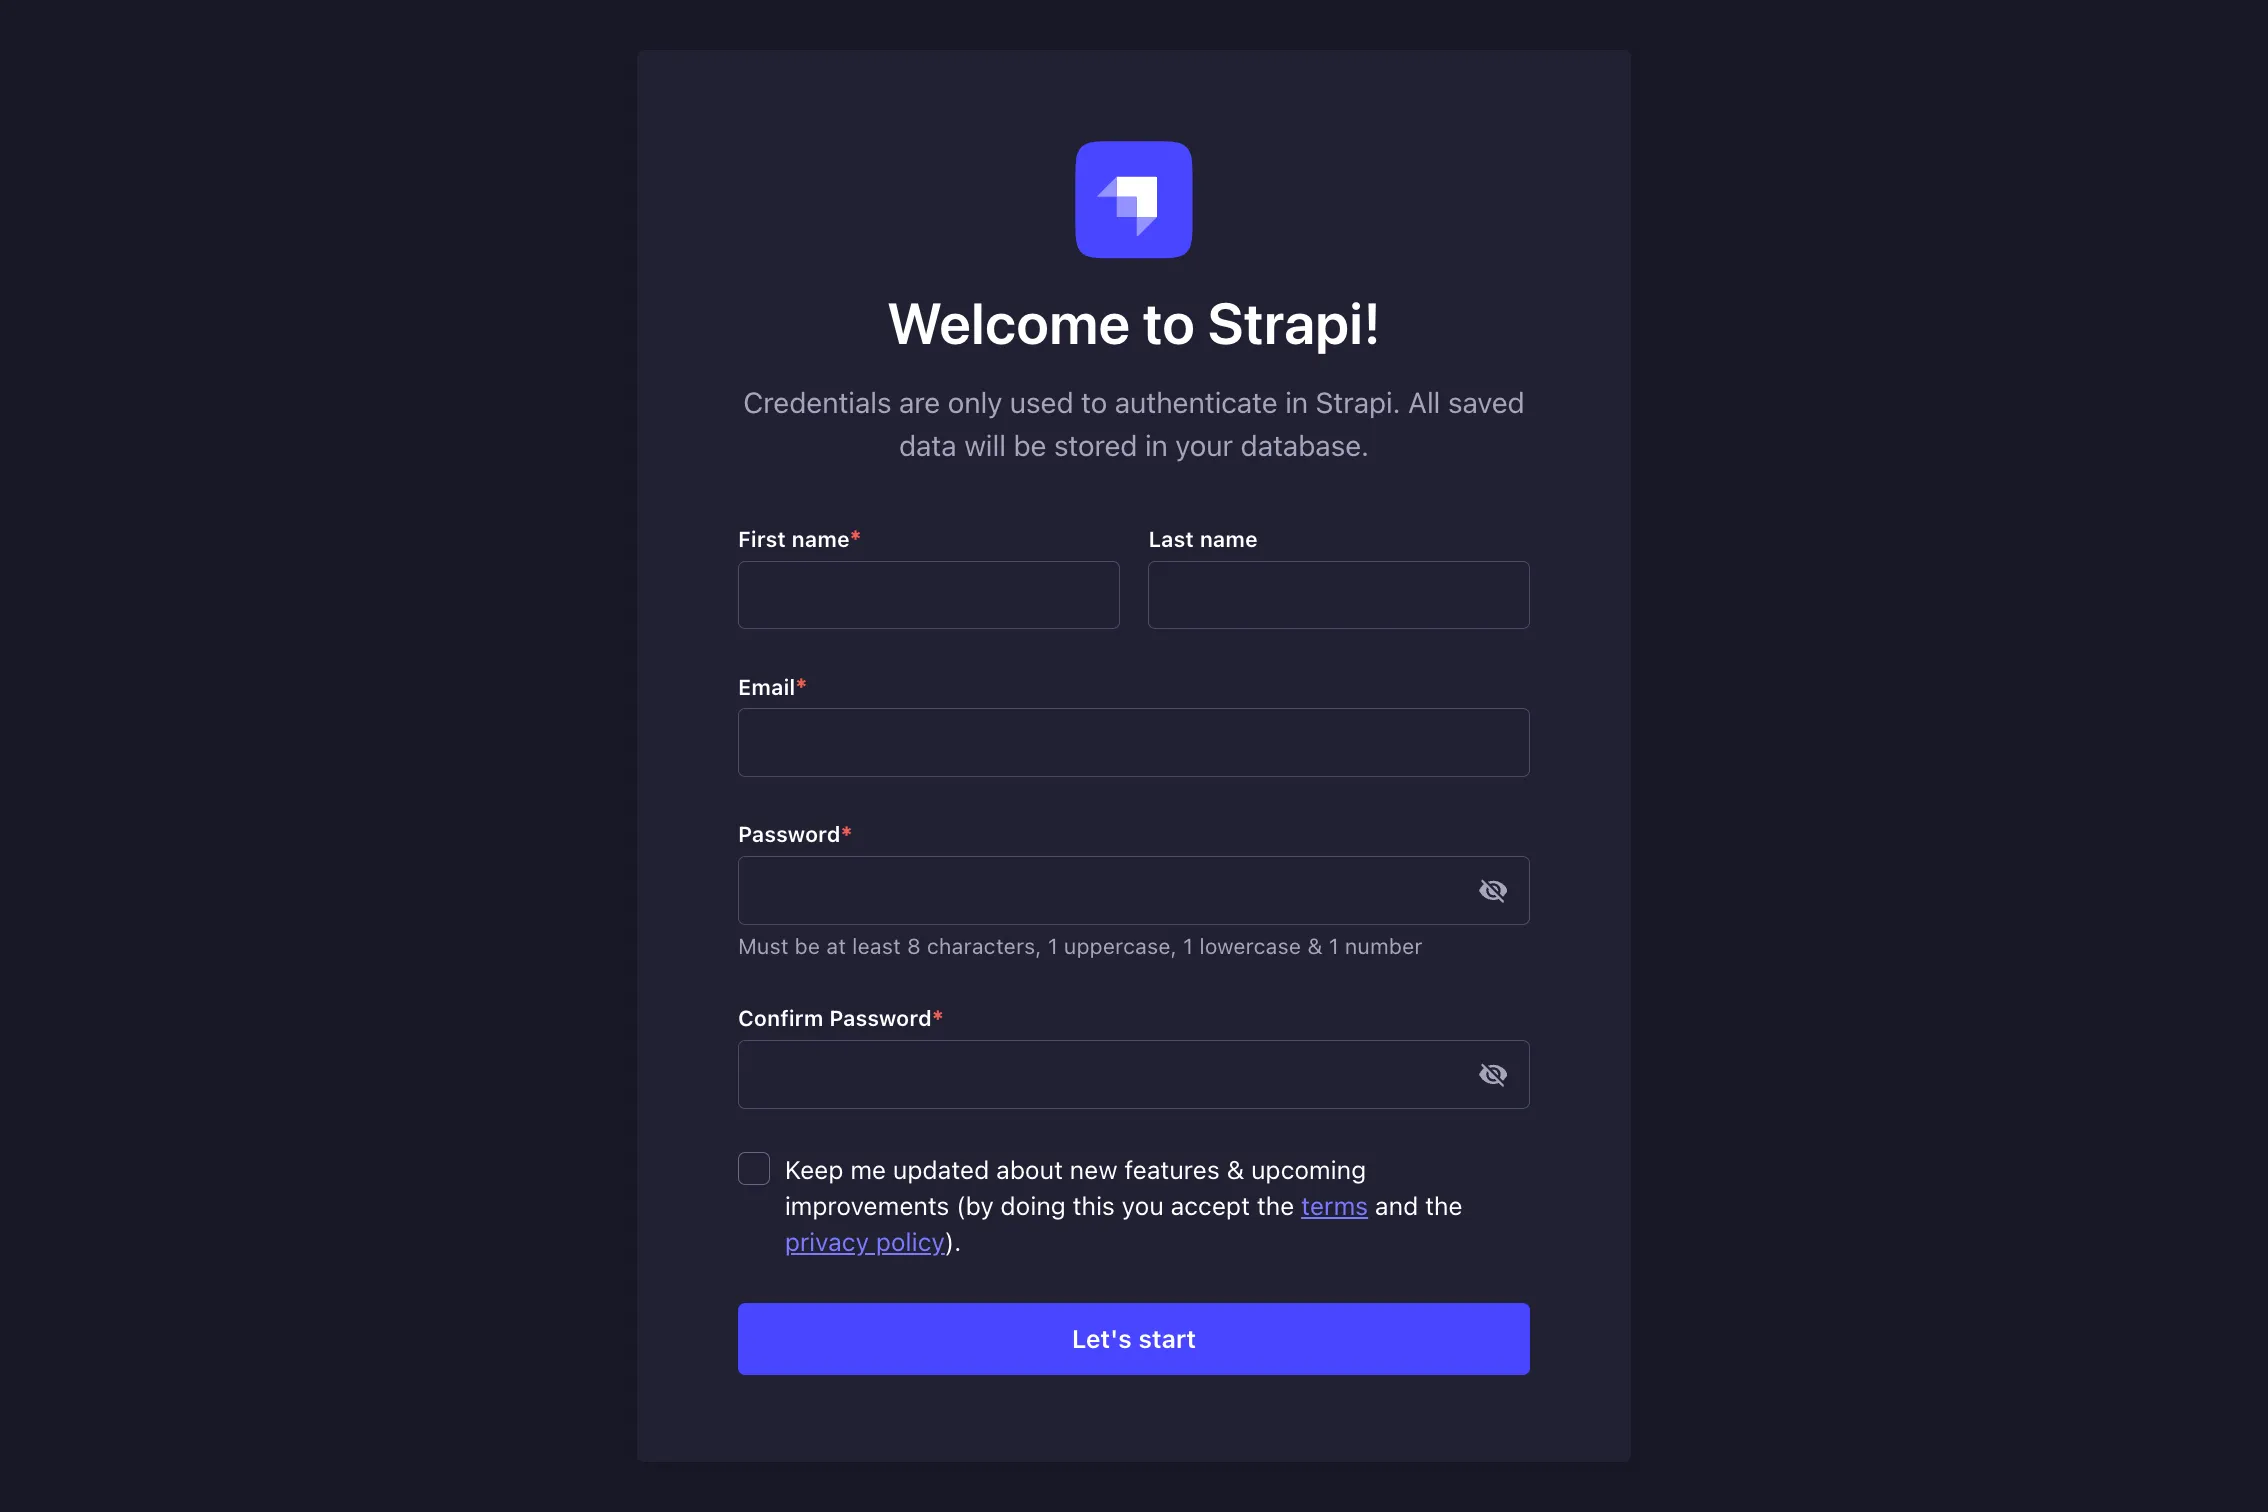
Once the setup has run, you will find a link in your terminal to set up your Strapi user. Open it in your browser to fill in the form to sign up.
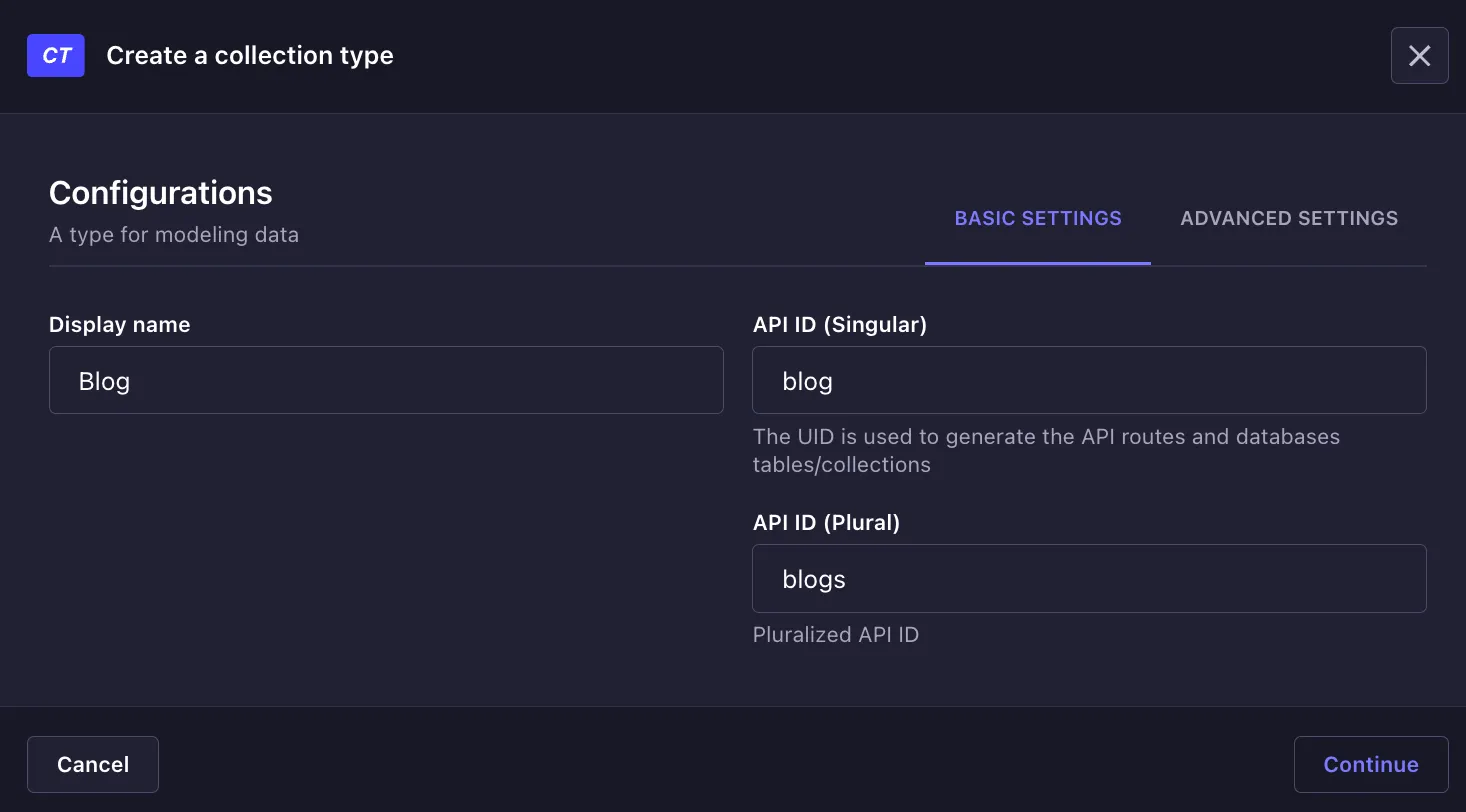
You will now be taken to the Strapi Dashboard. From here, click on Content-Type Builder and then Create new collection type.
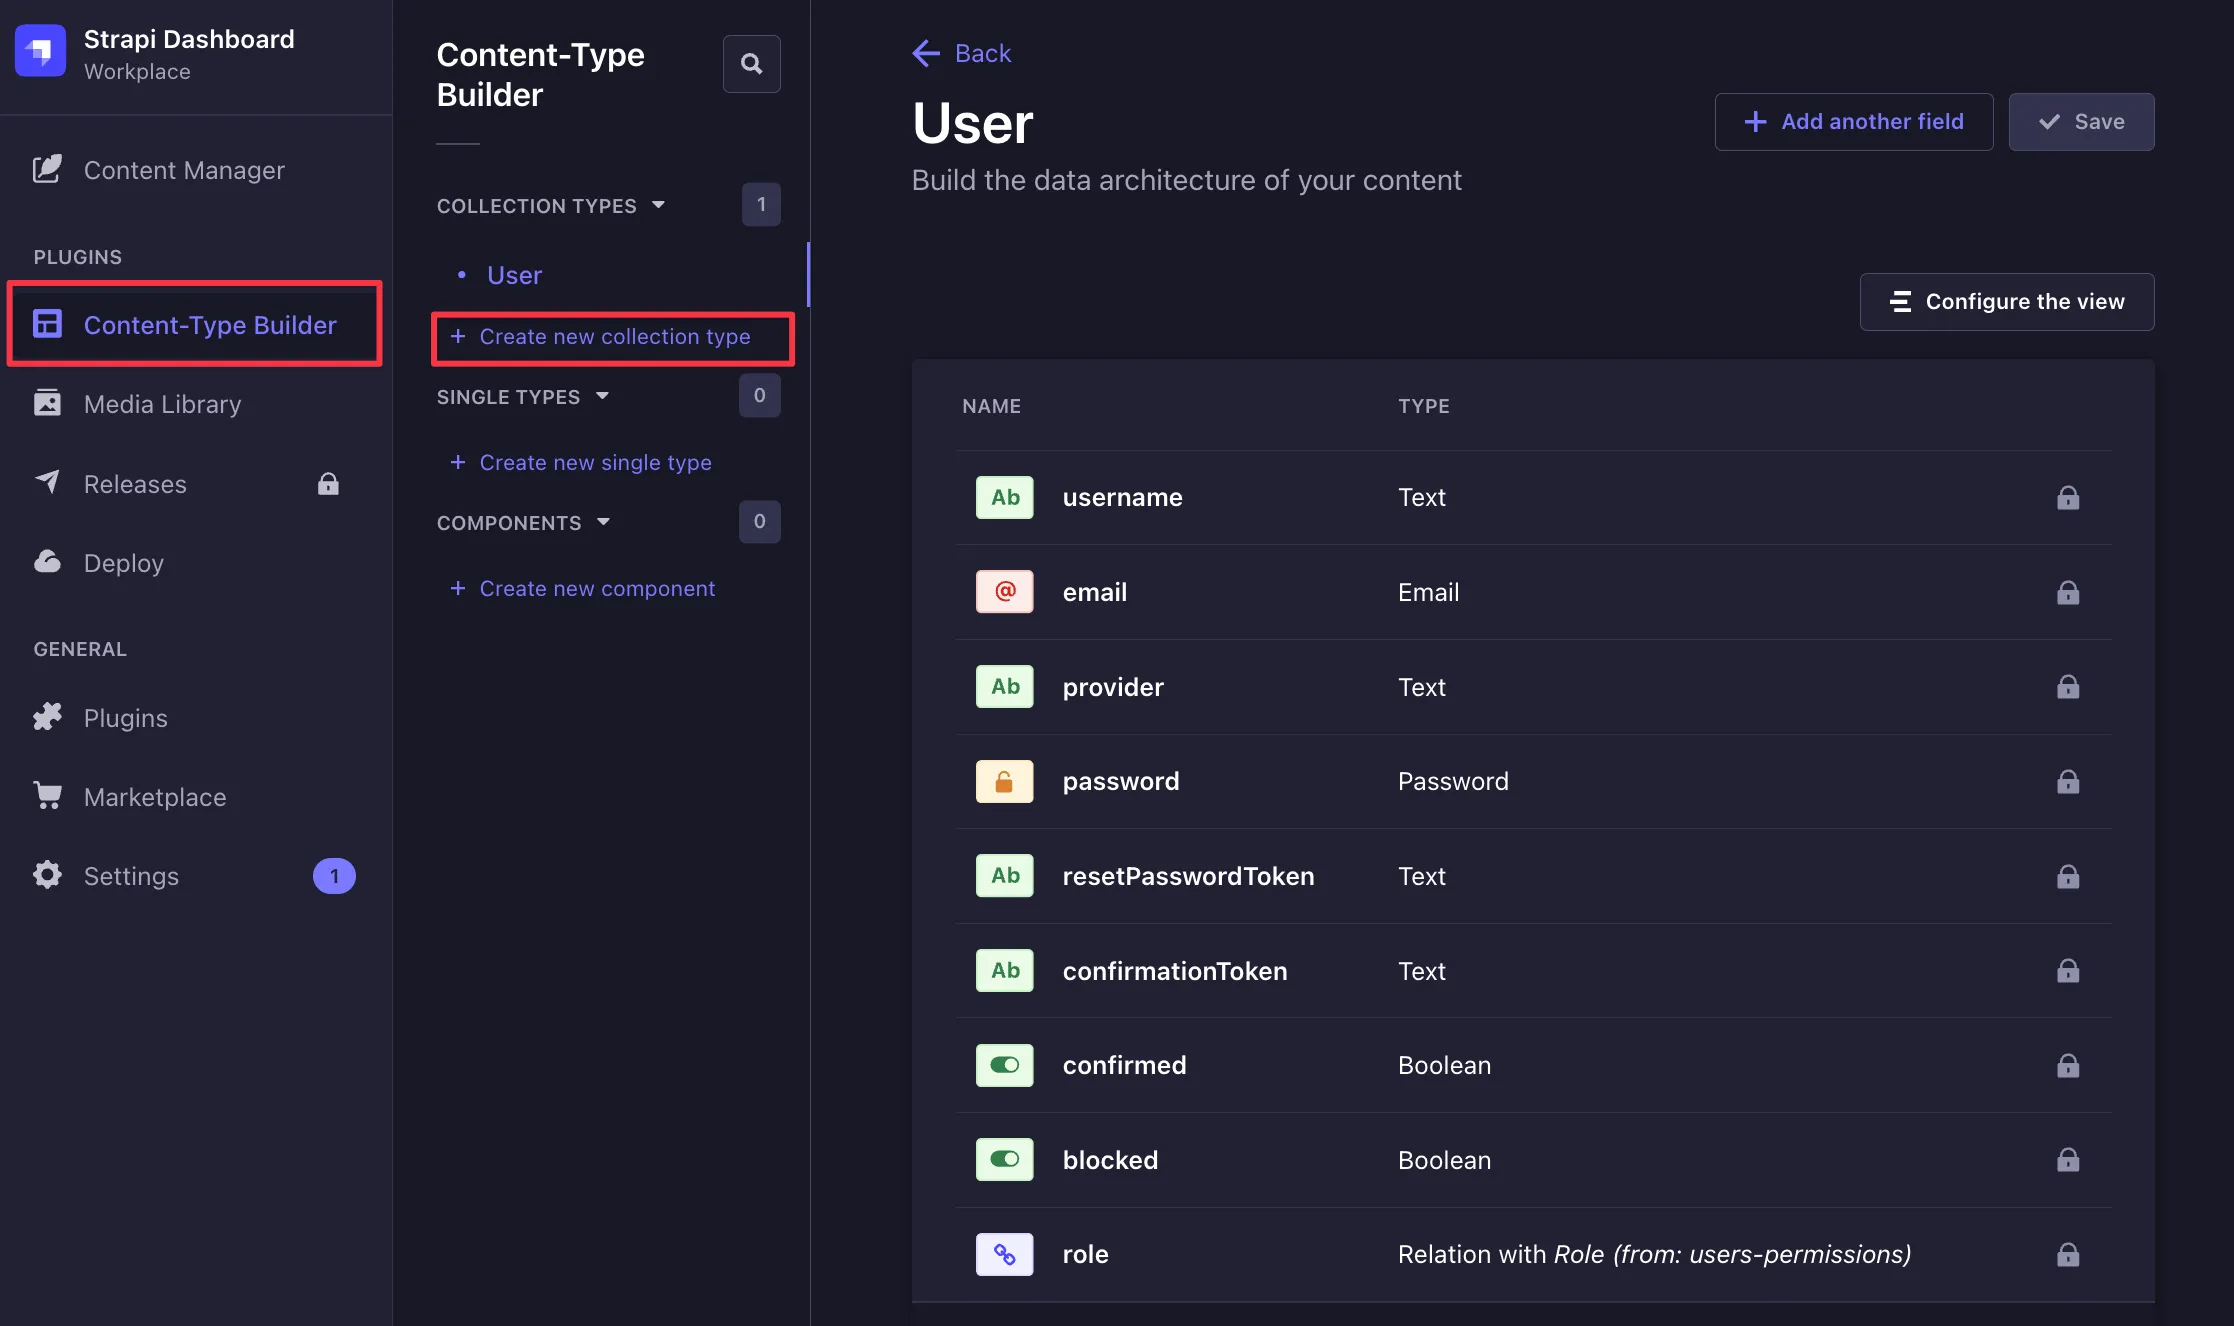
Call the collection type Blog. Do not yet press Continue, as we will need to modify the advanced settings.
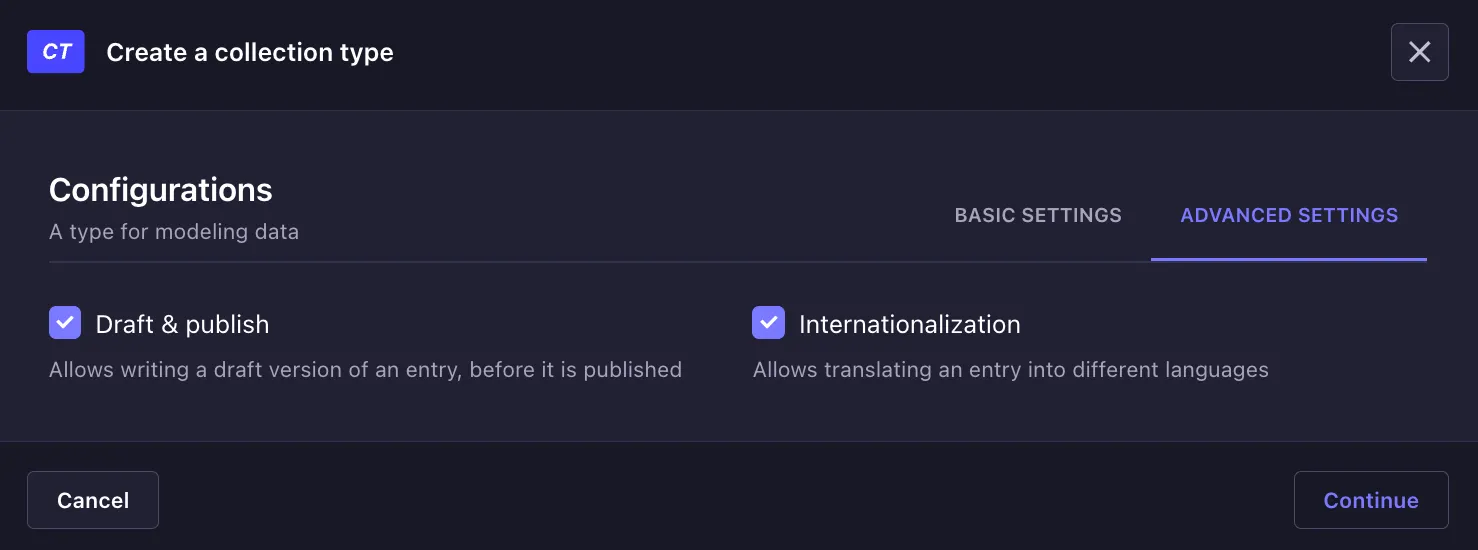
Navigate to the Advanced Settings and turn on the Internationalization checkbox, because we will want to translate the blog post into multiple languages.
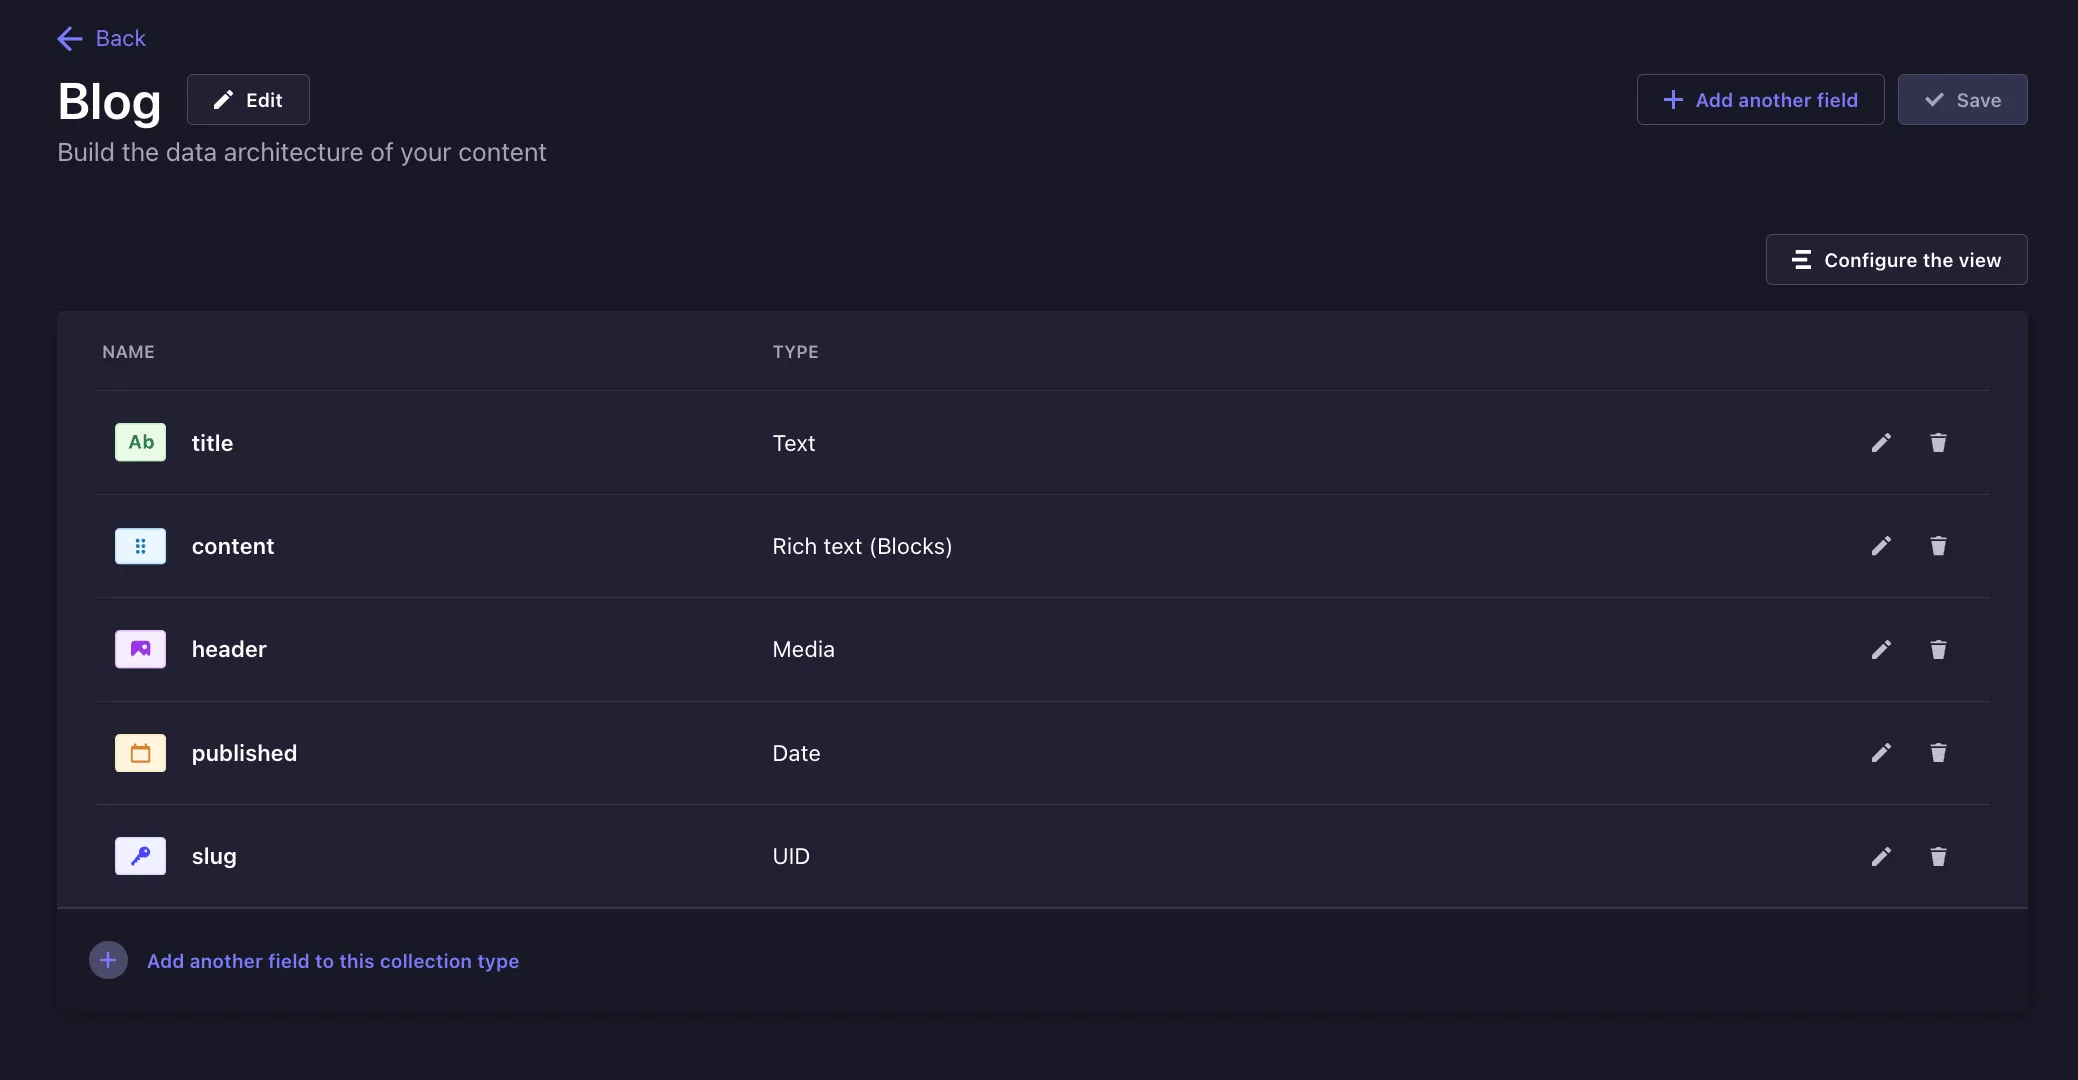
Now we will need to define the fields our blog posts should have. Add the following fields:
- title: Text, Required field
- content: Rich Text (Markdown), Required field, do not use Rich Text (Blocks)
- header: Media (image only), Optional field
- published: Date (without time), Required field, disable Internationalization
- slug: UID, attached to
title
Once you’re done, click the Save button. We now have the collection we need to start writing content. Let’s go ahead and create our first simple blog post.
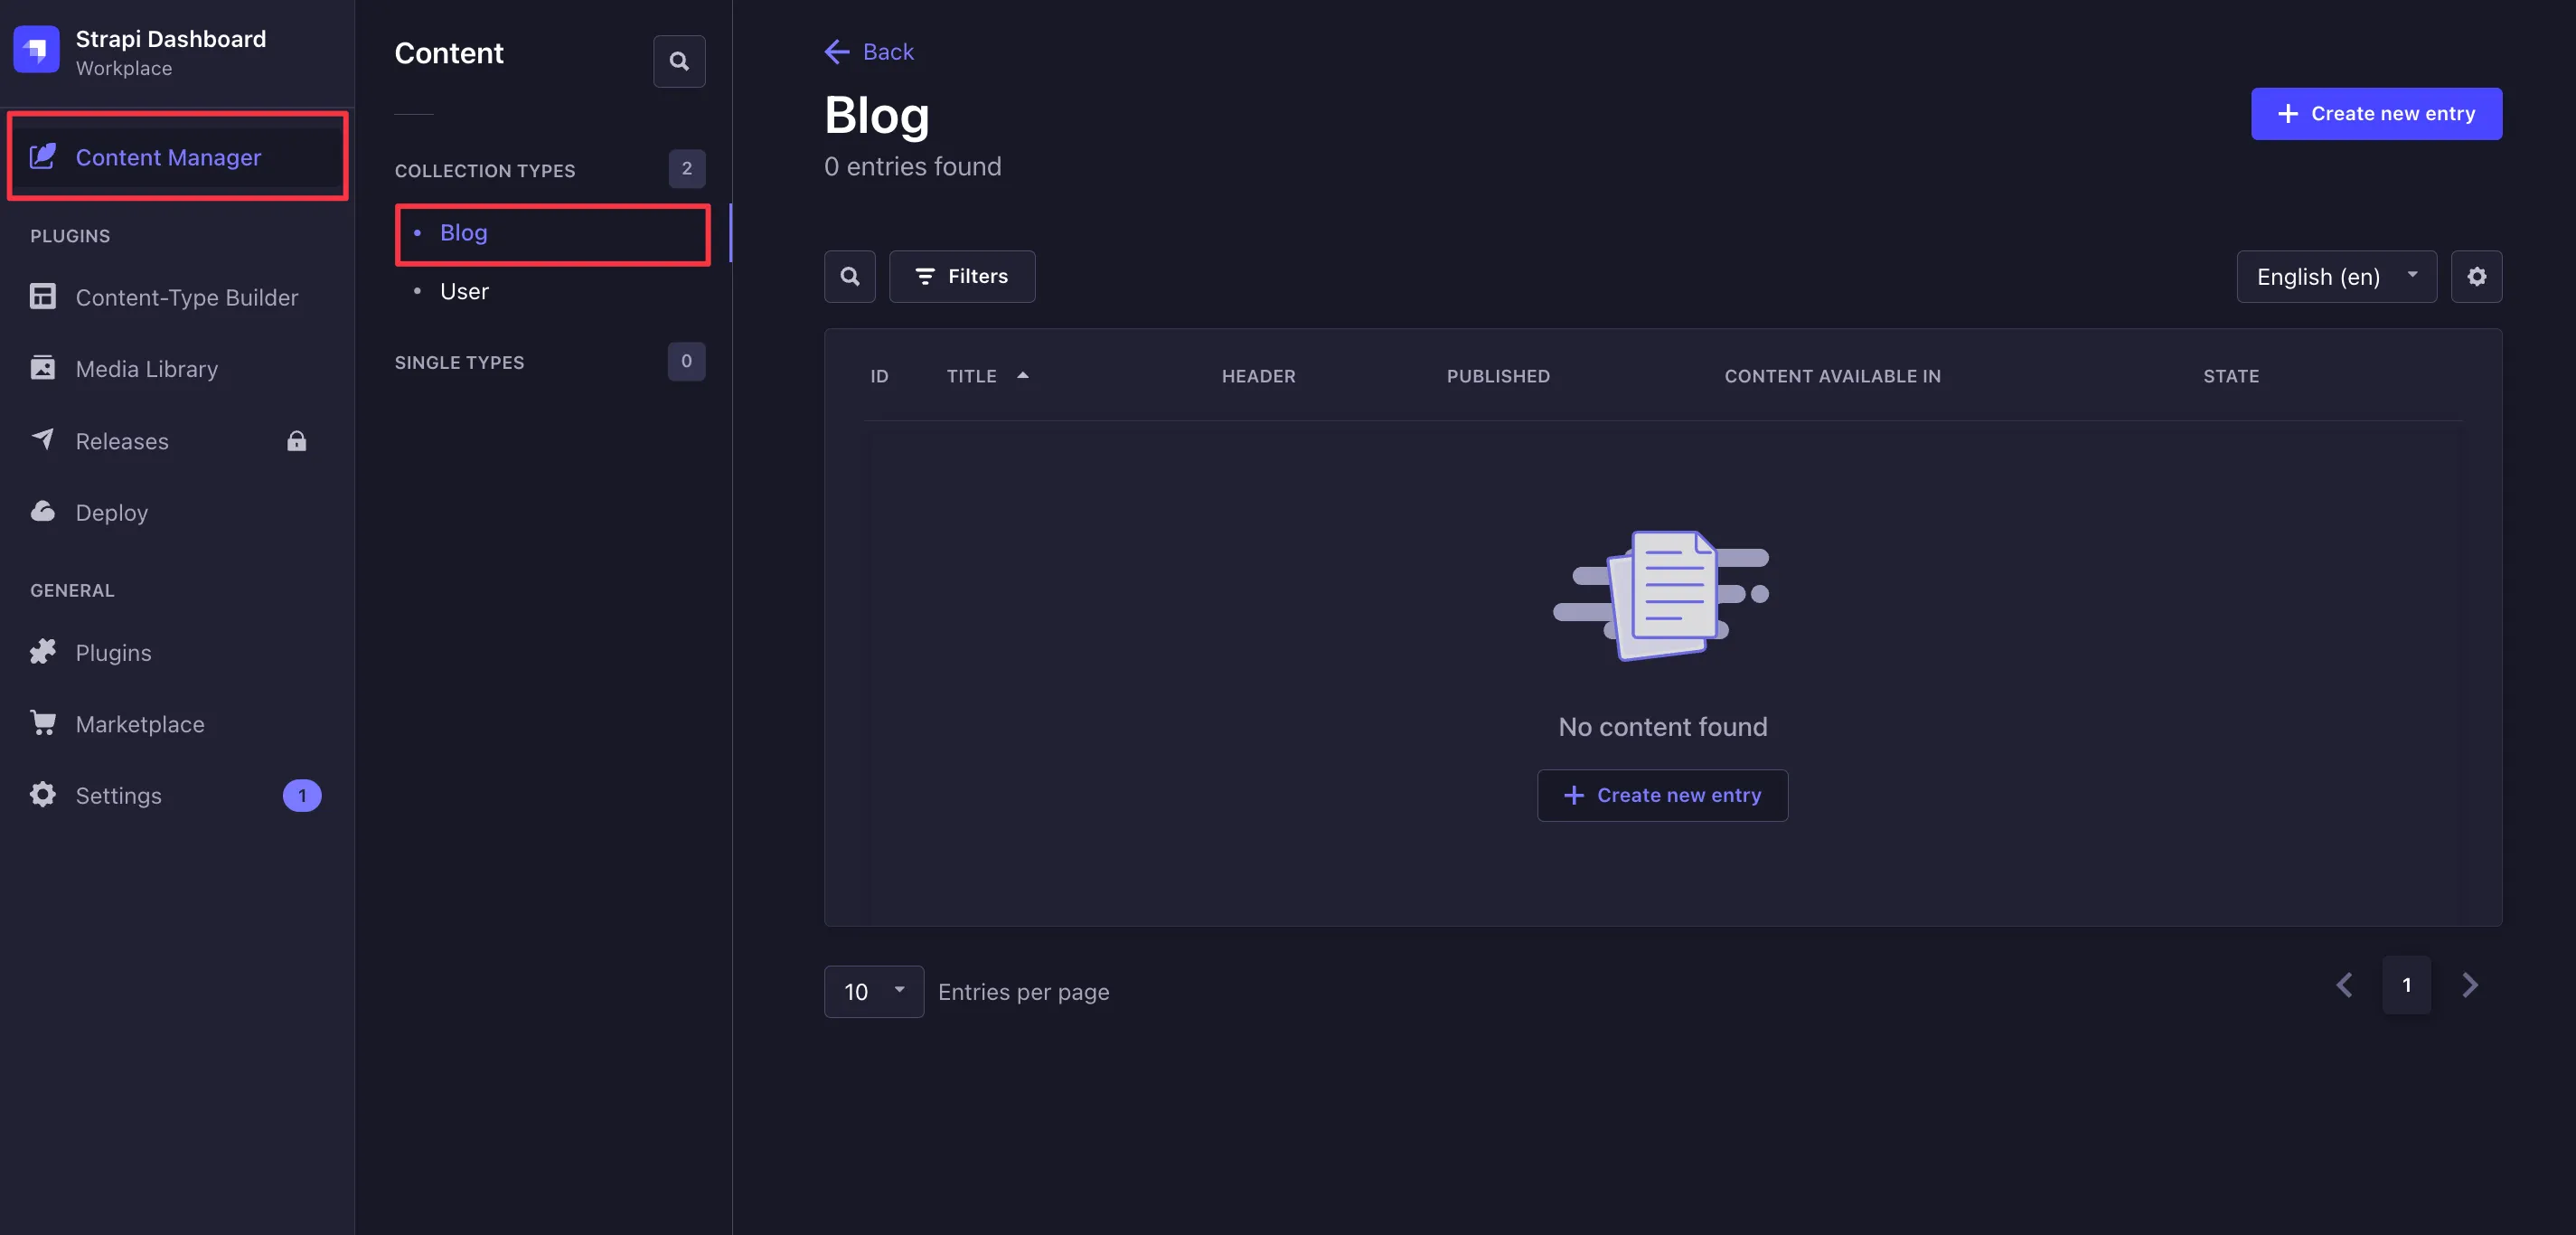
Click on Content Manager, Blog, and then Create new entry.
You can write whatever you want in here. However, we recommend using English instead of Lorem Ipsum so that later on we can make an actual translation of the content.
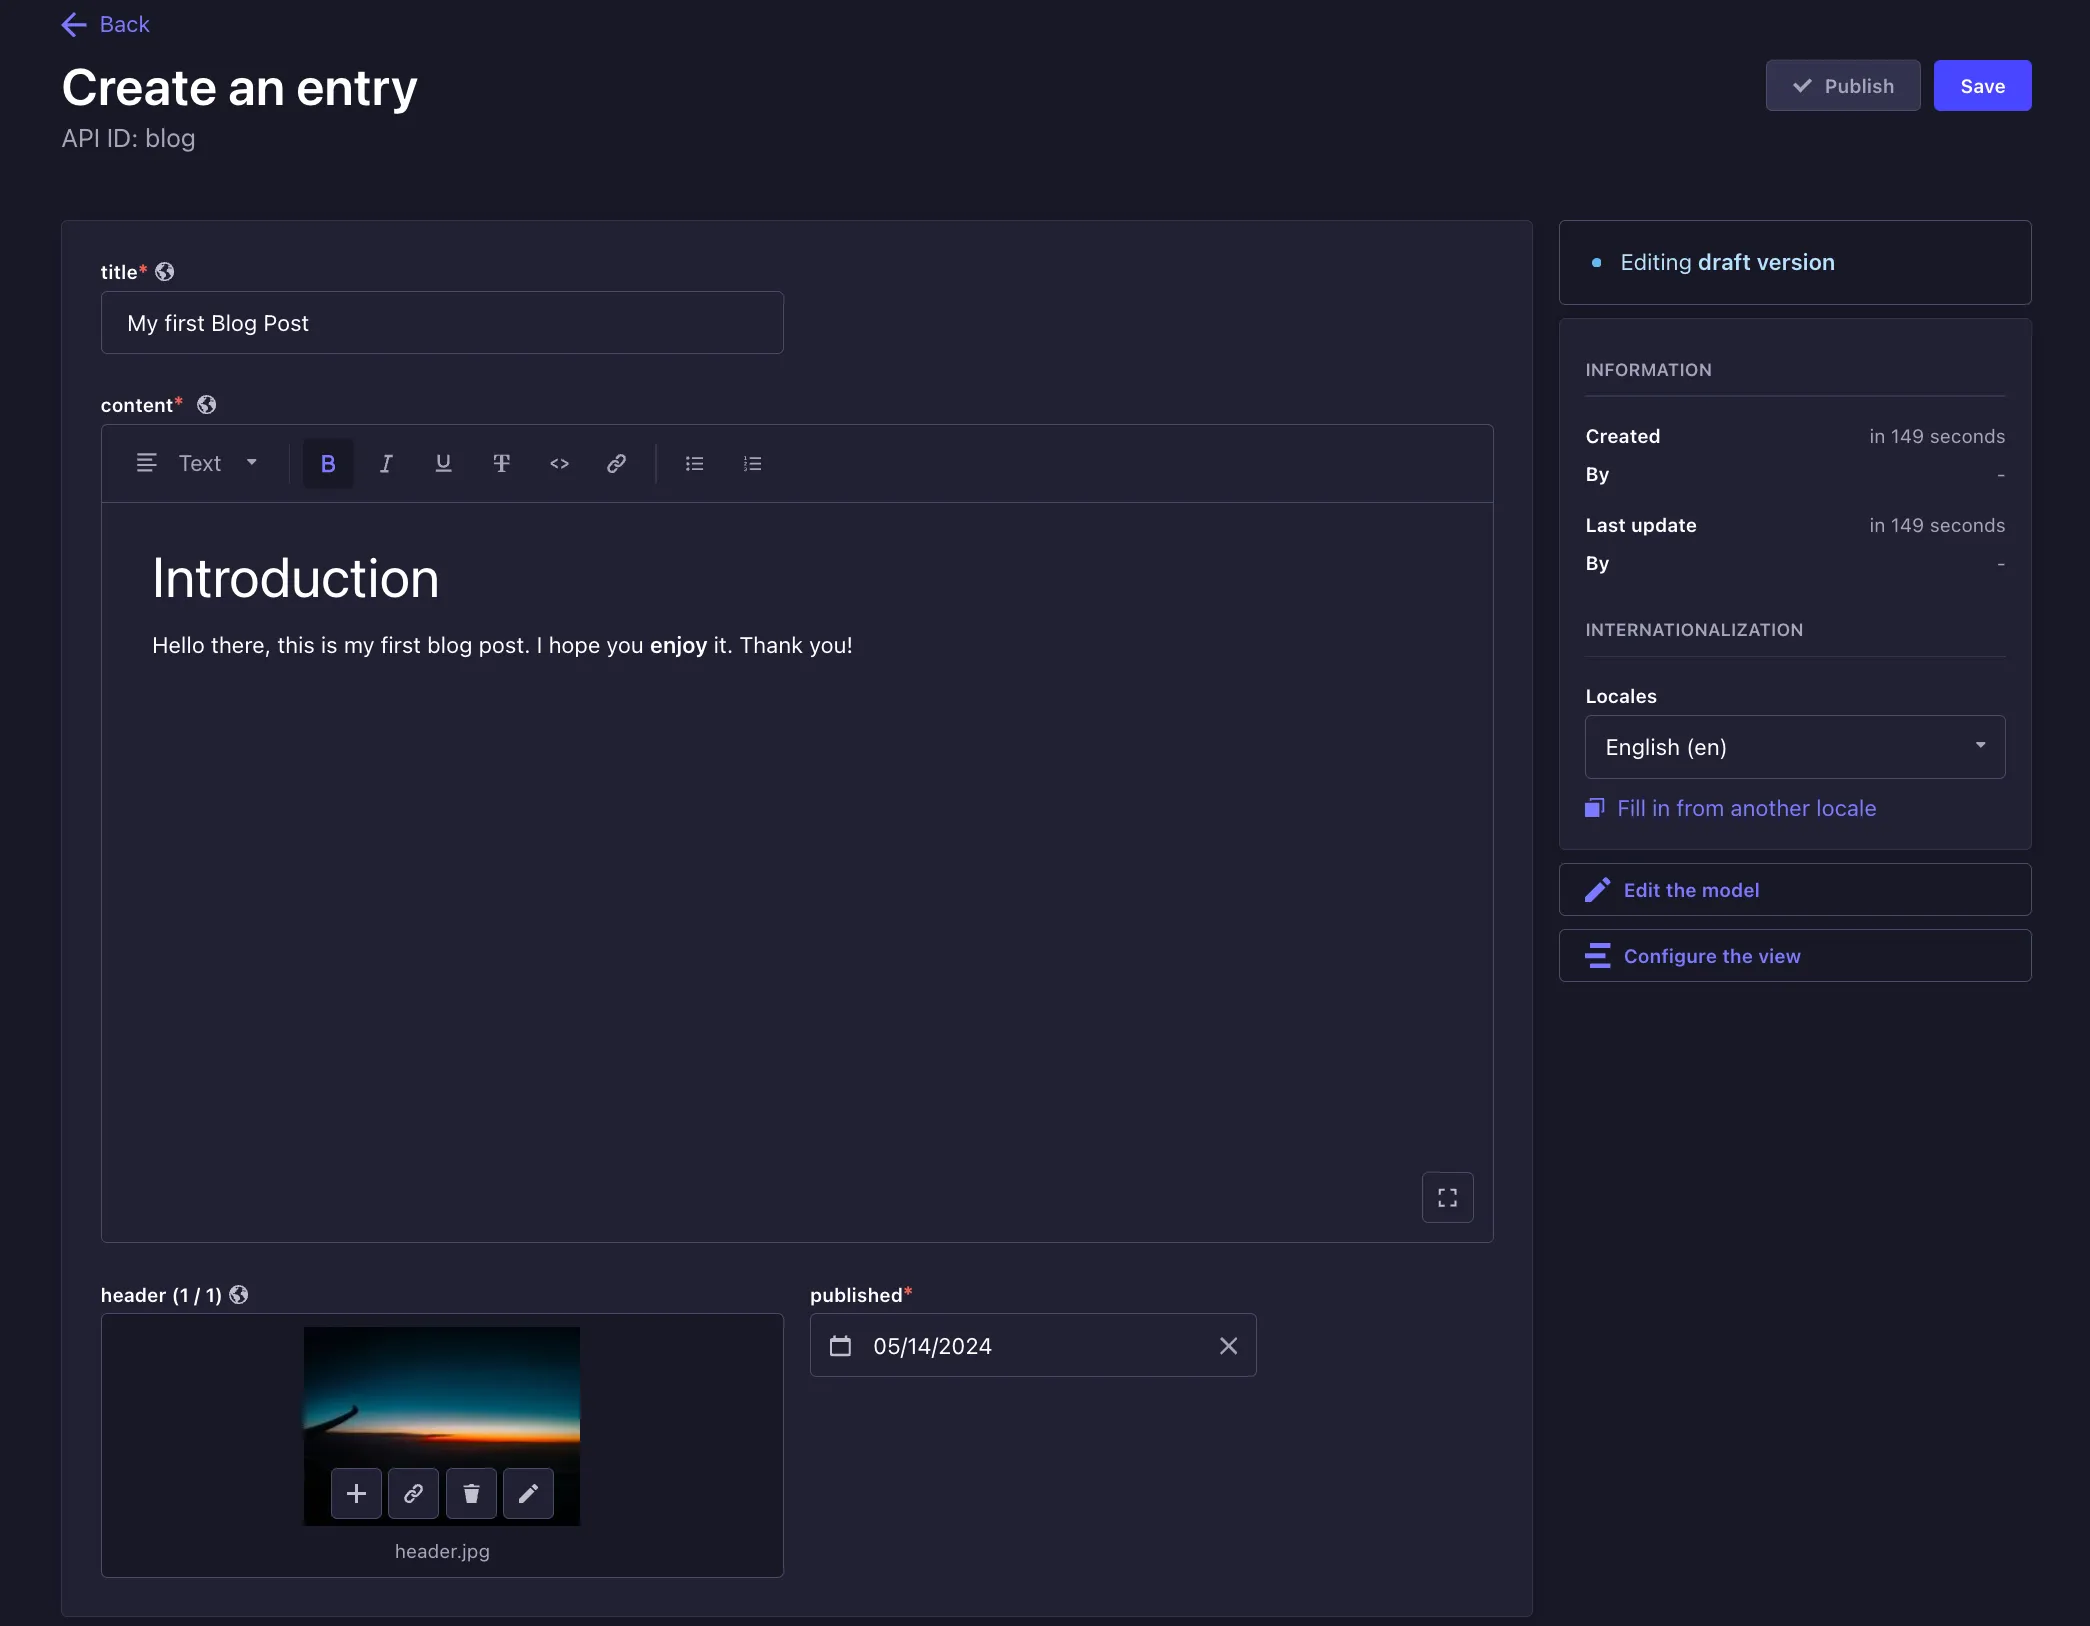
Once you’re ready, click Save and Publish to publish the post. If you want, you can go ahead and create another post so that we have more than one post to show on the website.
Making Posts Publicly Accessible
We now have posts in a defined collection but no way to access them from Astro. To change this, we need to make sure they can be accessed through the Strapi API. For this, navigate to Settings, Users & Permissions Plugin, and Roles. In there, select the Public role to grant find and findOne permissions to the Blog collection.
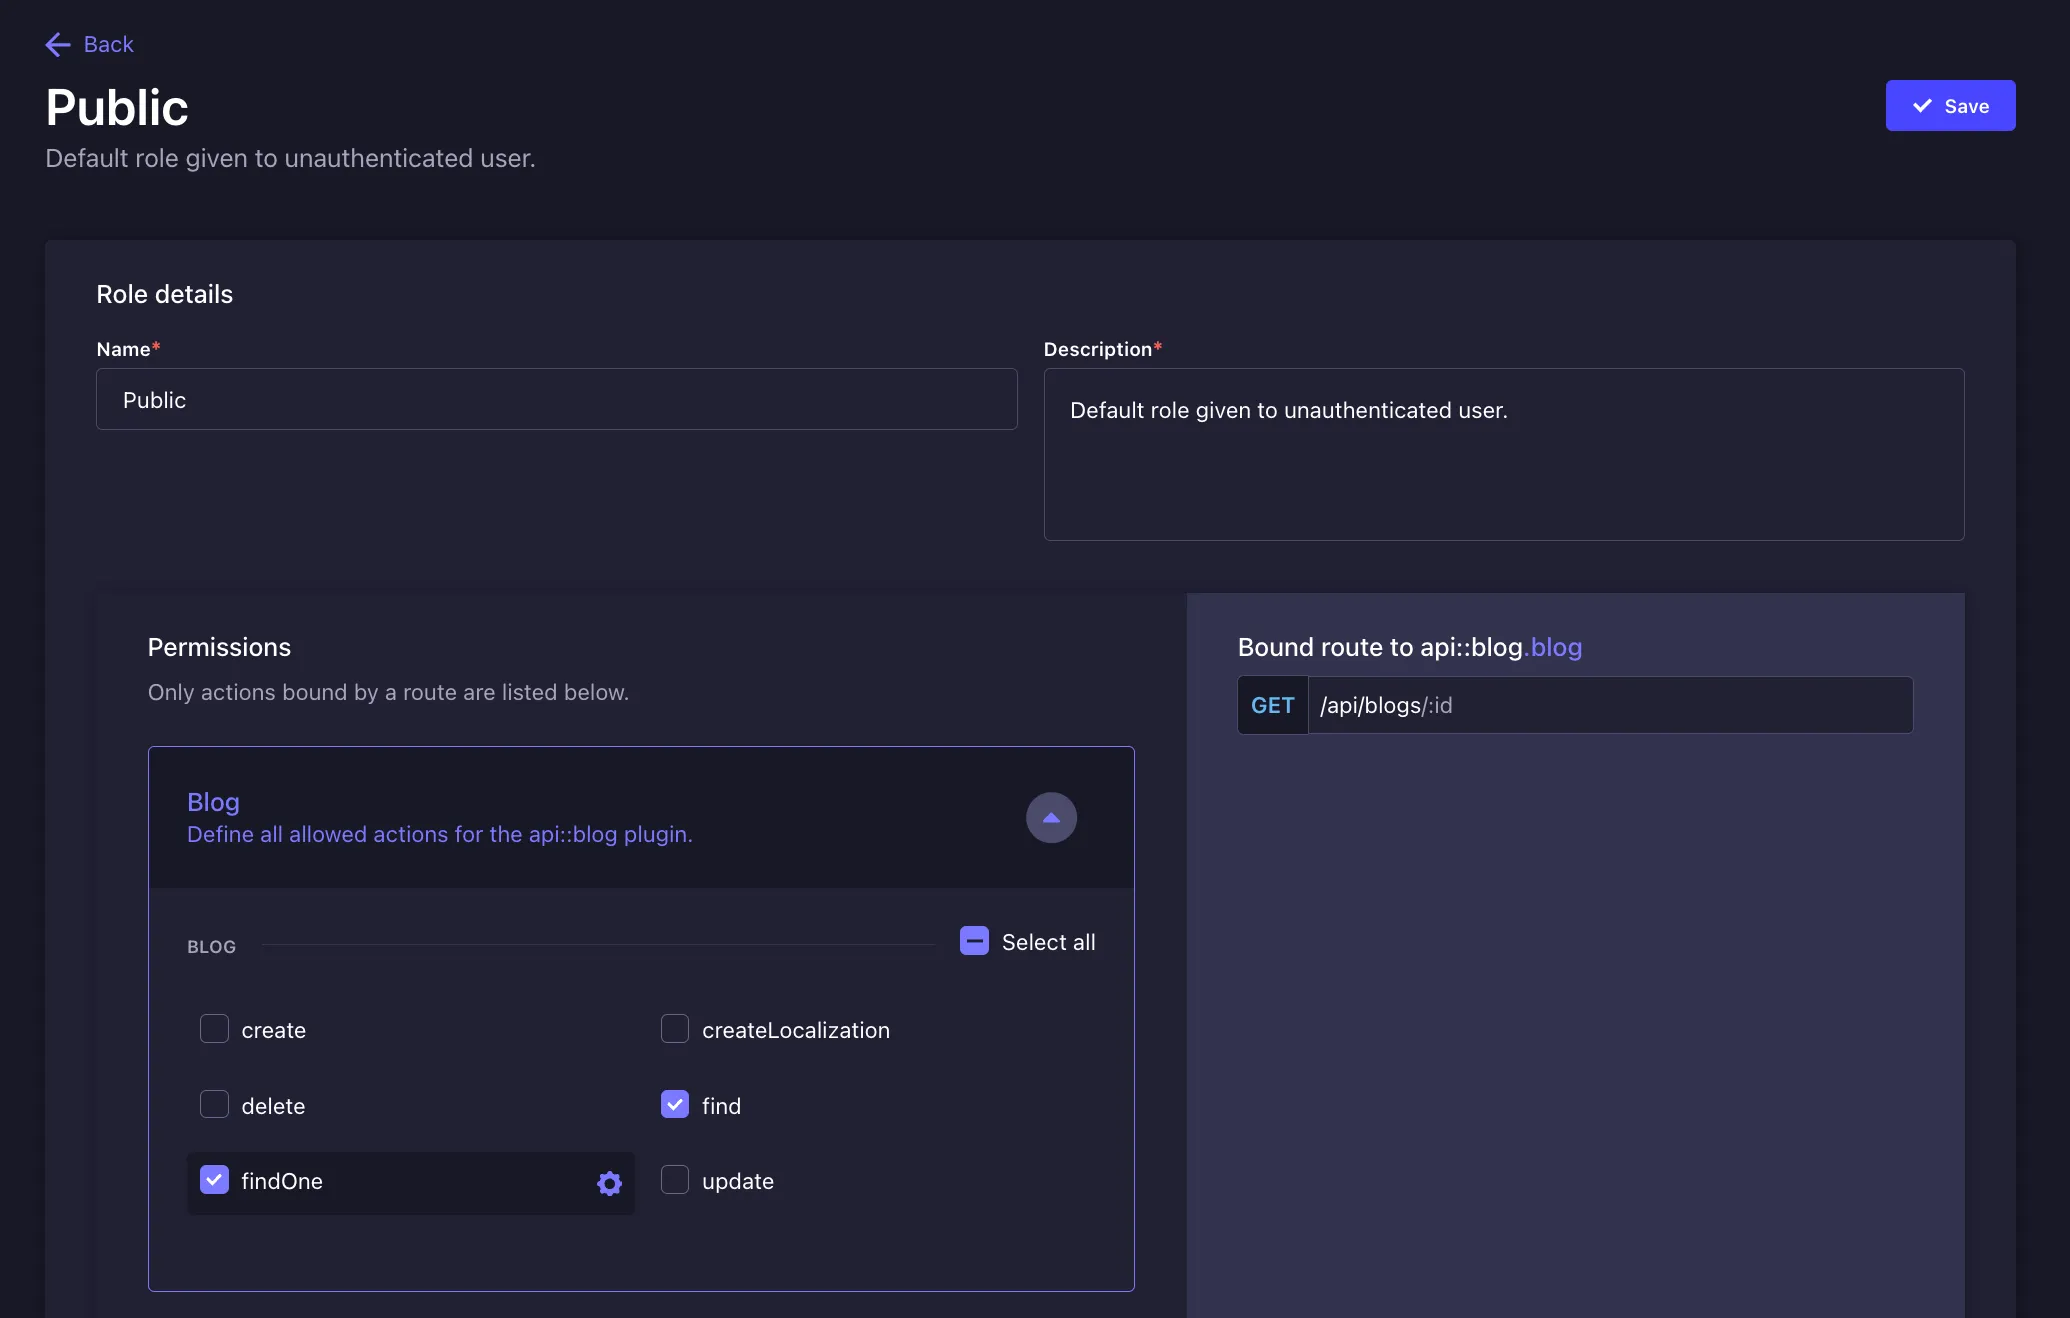
Make sure no other permissions are granted to the Public role, as this could lead to security issues. Once done, press Save.
Now you’ll be able to access your blog posts through the Strapi API at http://localhost:1337/api/blogs. Go try it out to make sure everything has worked. This is the API we will consume in our frontend to render the posts. With this, we’re ready to set up the Astro website for our blog.
Getting started with Astro
- Bootstrapping project
- Adding Tailwind, design skeleton
- Accessing Strapi API
First, we’ll need to set up Astro. Run the command below in your terminal to set up a new Astro site:
npm create astro@latest astro-blog
Select the following choices in the installation sequence:
 astro   Launch sequence initiated.

      ◼  dir Using astro-blog as project directory

  tmpl   How would you like to start your new project?
         Include sample files

    ts   Do you plan to write TypeScript?
         No
      ◼  No worries! TypeScript is supported in Astro by default,
         but you are free to continue writing JavaScript instead.

  deps   Install dependencies?
         Yes

   git   Initialize a new git repository?
         No
      ◼  Sounds good! You can always run git init manually.

      ✔  Project initialized!
         ■ Template copied
         ■ Dependencies installed

  next   Liftoff confirmed. Explore your project!

         Enter your project directory using cd ./astro-blog
         Run npm run dev to start the dev server. CTRL+C to stop.
         Add frameworks like react or tailwind using astro add.

         Stuck? Join us at https://astro.build/chat

╭─────╮  Houston:
│ ◠ ◡ ◠  Good luck out there, astronaut! 🚀
╰─────╯
Now that we have installed Astro, change into the astro-blog directory. Then we want to add Tailwind CSS to style our blog. For this, first run this command in your terminal and say Yes to all choices:
npx astro add tailwind
This has automatically set up Tailwind CSS in Astro for us. But we also need the Tailwind Typography plugin so that we can style the prose in the posts. So once again, open your terminal and run:
npm install -D @tailwindcss/typography
Modify your tailwind.config.mjs file so that it imports the Typography plugin:
/** @type {import('tailwindcss').Config} */
export default {
  content: ['./src/**/*.{astro,html,js,jsx,md,mdx,svelte,ts,tsx,vue}'],
  theme: {
    extend: {},
  },
  plugins: [require('@tailwindcss/typography')],
};
Now start the application using npm run dev and visit http://localhost:4321/ to see the Astro site.

Building the Layout
Our blog will consist of two pages: /blog, which will show all blog posts, and /blog/[slug], which will show a single blog post. Both will have a common layout with a title and eventually a language picker.
So let’s get started with building this common layout. Create a new file at /src/layouts/BlogLayout.astro with the following content:
---
import Layout from './Layout.astro';

interface Props {
  title: string;
}

const { title } = Astro.props;
---

<Layout title={title}>
  <header class="bg-blue-600 text-white text-center py-4">
    <h1 class="text-3xl font-bold">
      <a href="/blog" class="text-white"> Astro Blog </a>
    </h1>
  </header>

  <slot />
</Layout>
See how we import the already existing layout at /src/layouts/Layout.astro. While you’re at it, open this file and remove the <style> tag, since we’re using Tailwind for everything. Afterwards, it should look like this:
---
interface Props {
  title: string;
}

const { title } = Astro.props;
---

<!doctype html>
<html lang="en">
  <head>
    <meta charset="UTF-8" />
    <meta name="description" content="Astro description" />
    <meta name="viewport" content="width=device-width" />
    <link rel="icon" type="image/svg+xml" href="/favicon.svg" />
    <meta name="generator" content={Astro.generator} />
    <title>{title}</title>
  </head>
  <body>
    <slot />
  </body>
</html>
Rendering all Posts
Now we have the building blocks we need to render an overview of all Blog Posts. First, create a .env file in the root of your project and add the API URL in there:
STRAPI_URL=http://localhost:1337
We will use this to call the Strapi API from Astro. If you deploy your site, this will need to be set to the Strapi production URL instead of localhost.
Create a new file at /src/pages/blog/index.astro which will serve as the overview page for our blog. Add this content to the file:
---
import BlogLayout from '../../layouts/BlogLayout.astro';

const response = await fetch(`${import.meta.env.STRAPI_URL}/api/blogs?populate=header`);
const data = await response.json();
const posts = data.data;
---

<BlogLayout title="All Posts">
  <main class="container mx-auto mt-8 px-4">
    <div class="space-y-6 max-w-lg mx-auto">
      {
        posts.map((post) => {
          const headerImageUrl = post.attributes.header?.data[0]?.attributes?.formats?.small?.url;
          return (
            <a
              href={`/blog/${post.attributes.slug}`}
              class="block bg-white rounded-lg shadow-md overflow-hidden hover:shadow-lg transition-shadow duration-300 max-w-md mx-auto"
            >
              {headerImageUrl && (
                <img
                  src={`${import.meta.env.STRAPI_URL}${headerImageUrl}`}
                  alt="Article Header Image"
                  class="w-full h-48 object-cover"
                />
              )}
              <div class="p-4">
                <h2 class="text-xl font-bold mb-2">{post.attributes.title}</h2>
                <p class="text-gray-600 text-sm">
                  Released on: {new Date(post.attributes.publishedAt).toLocaleDateString()}
                </p>
              </div>
            </a>
          );
        })
      }
    </div>
  </main>
</BlogLayout>
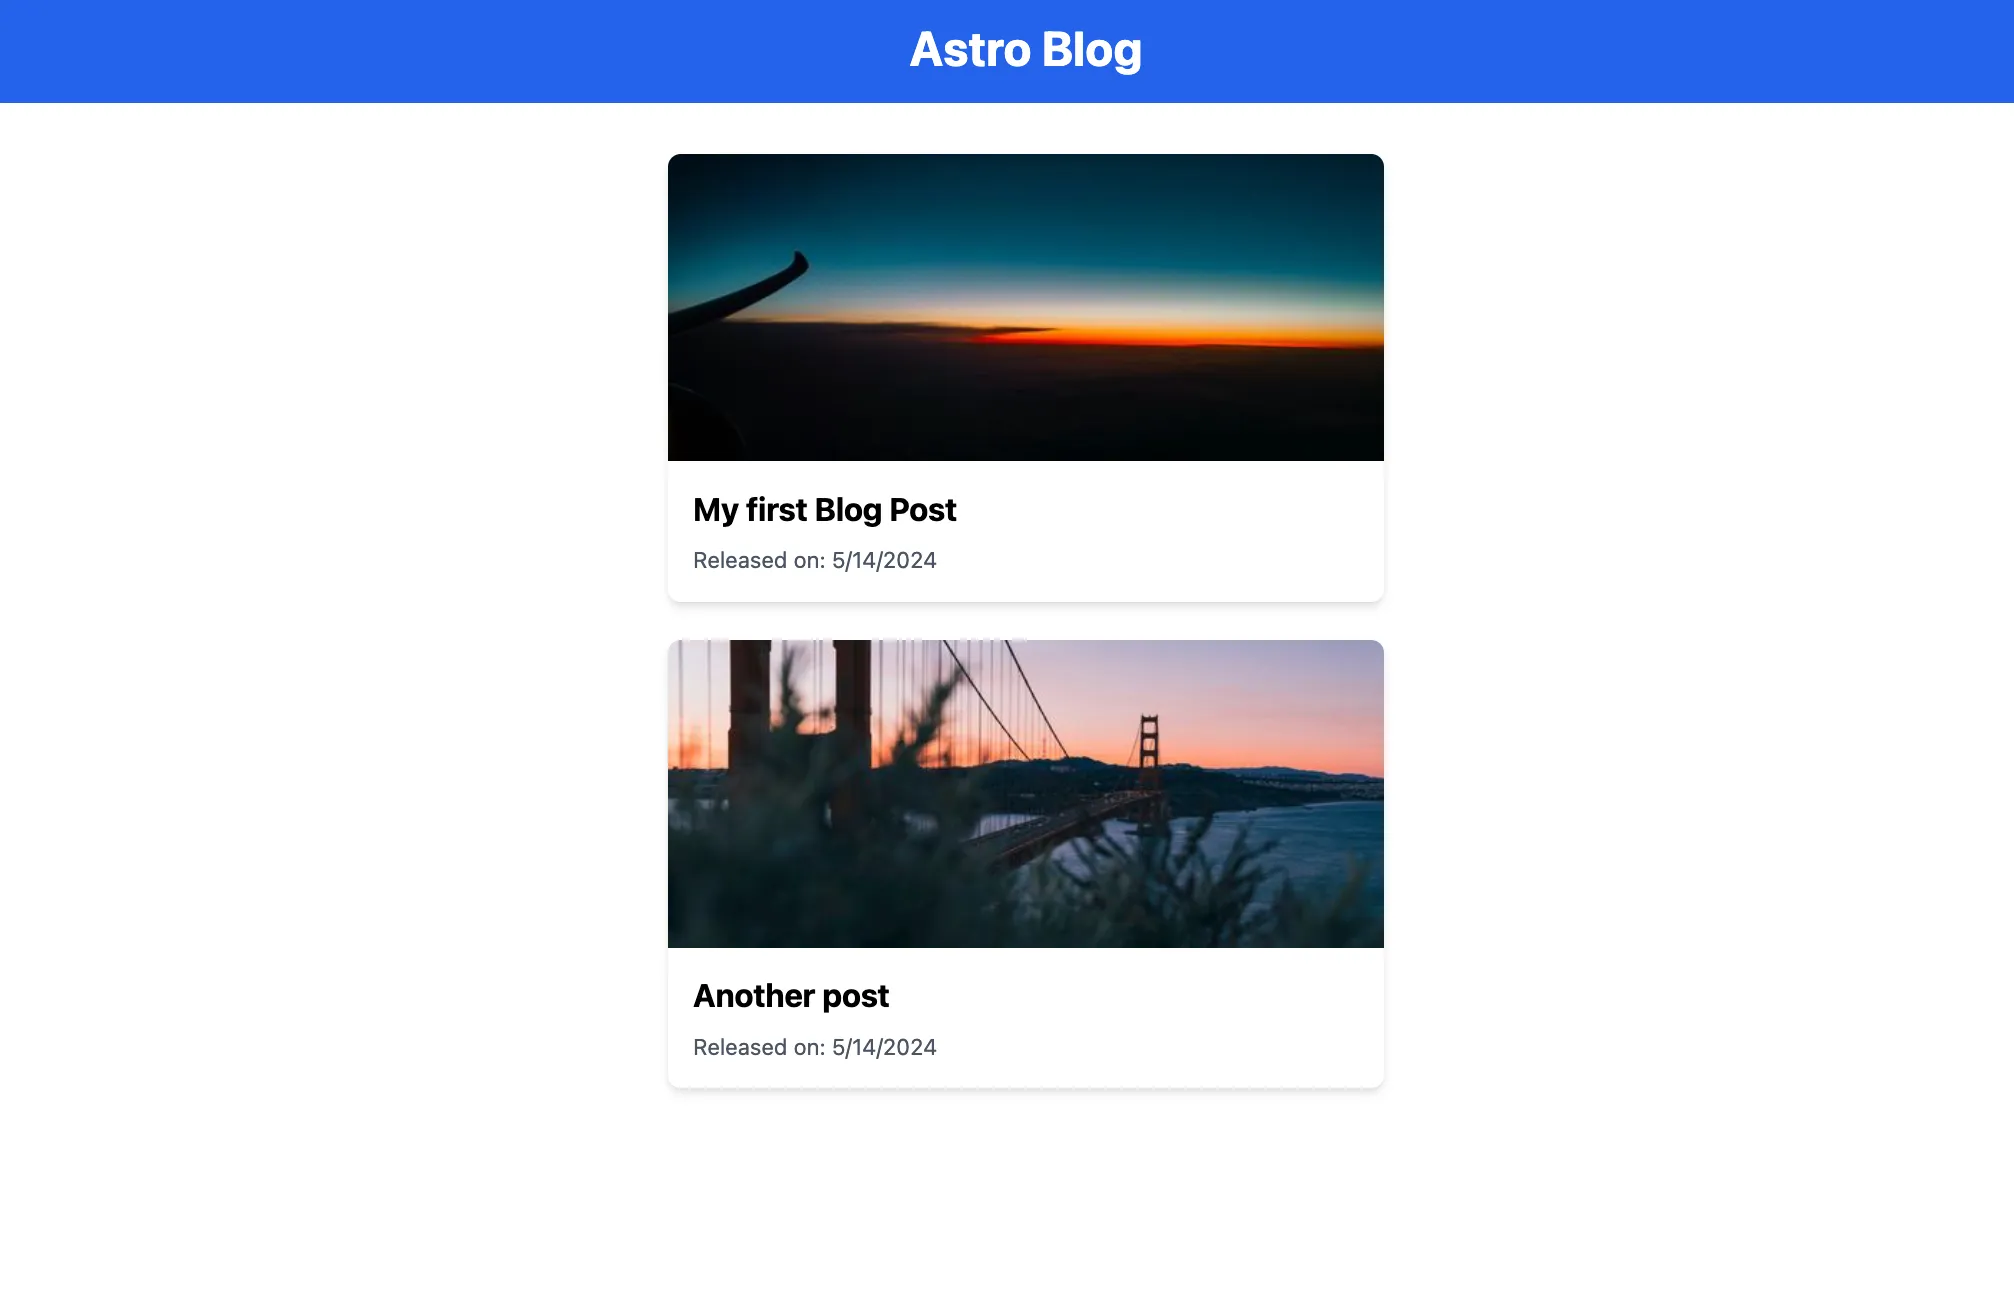
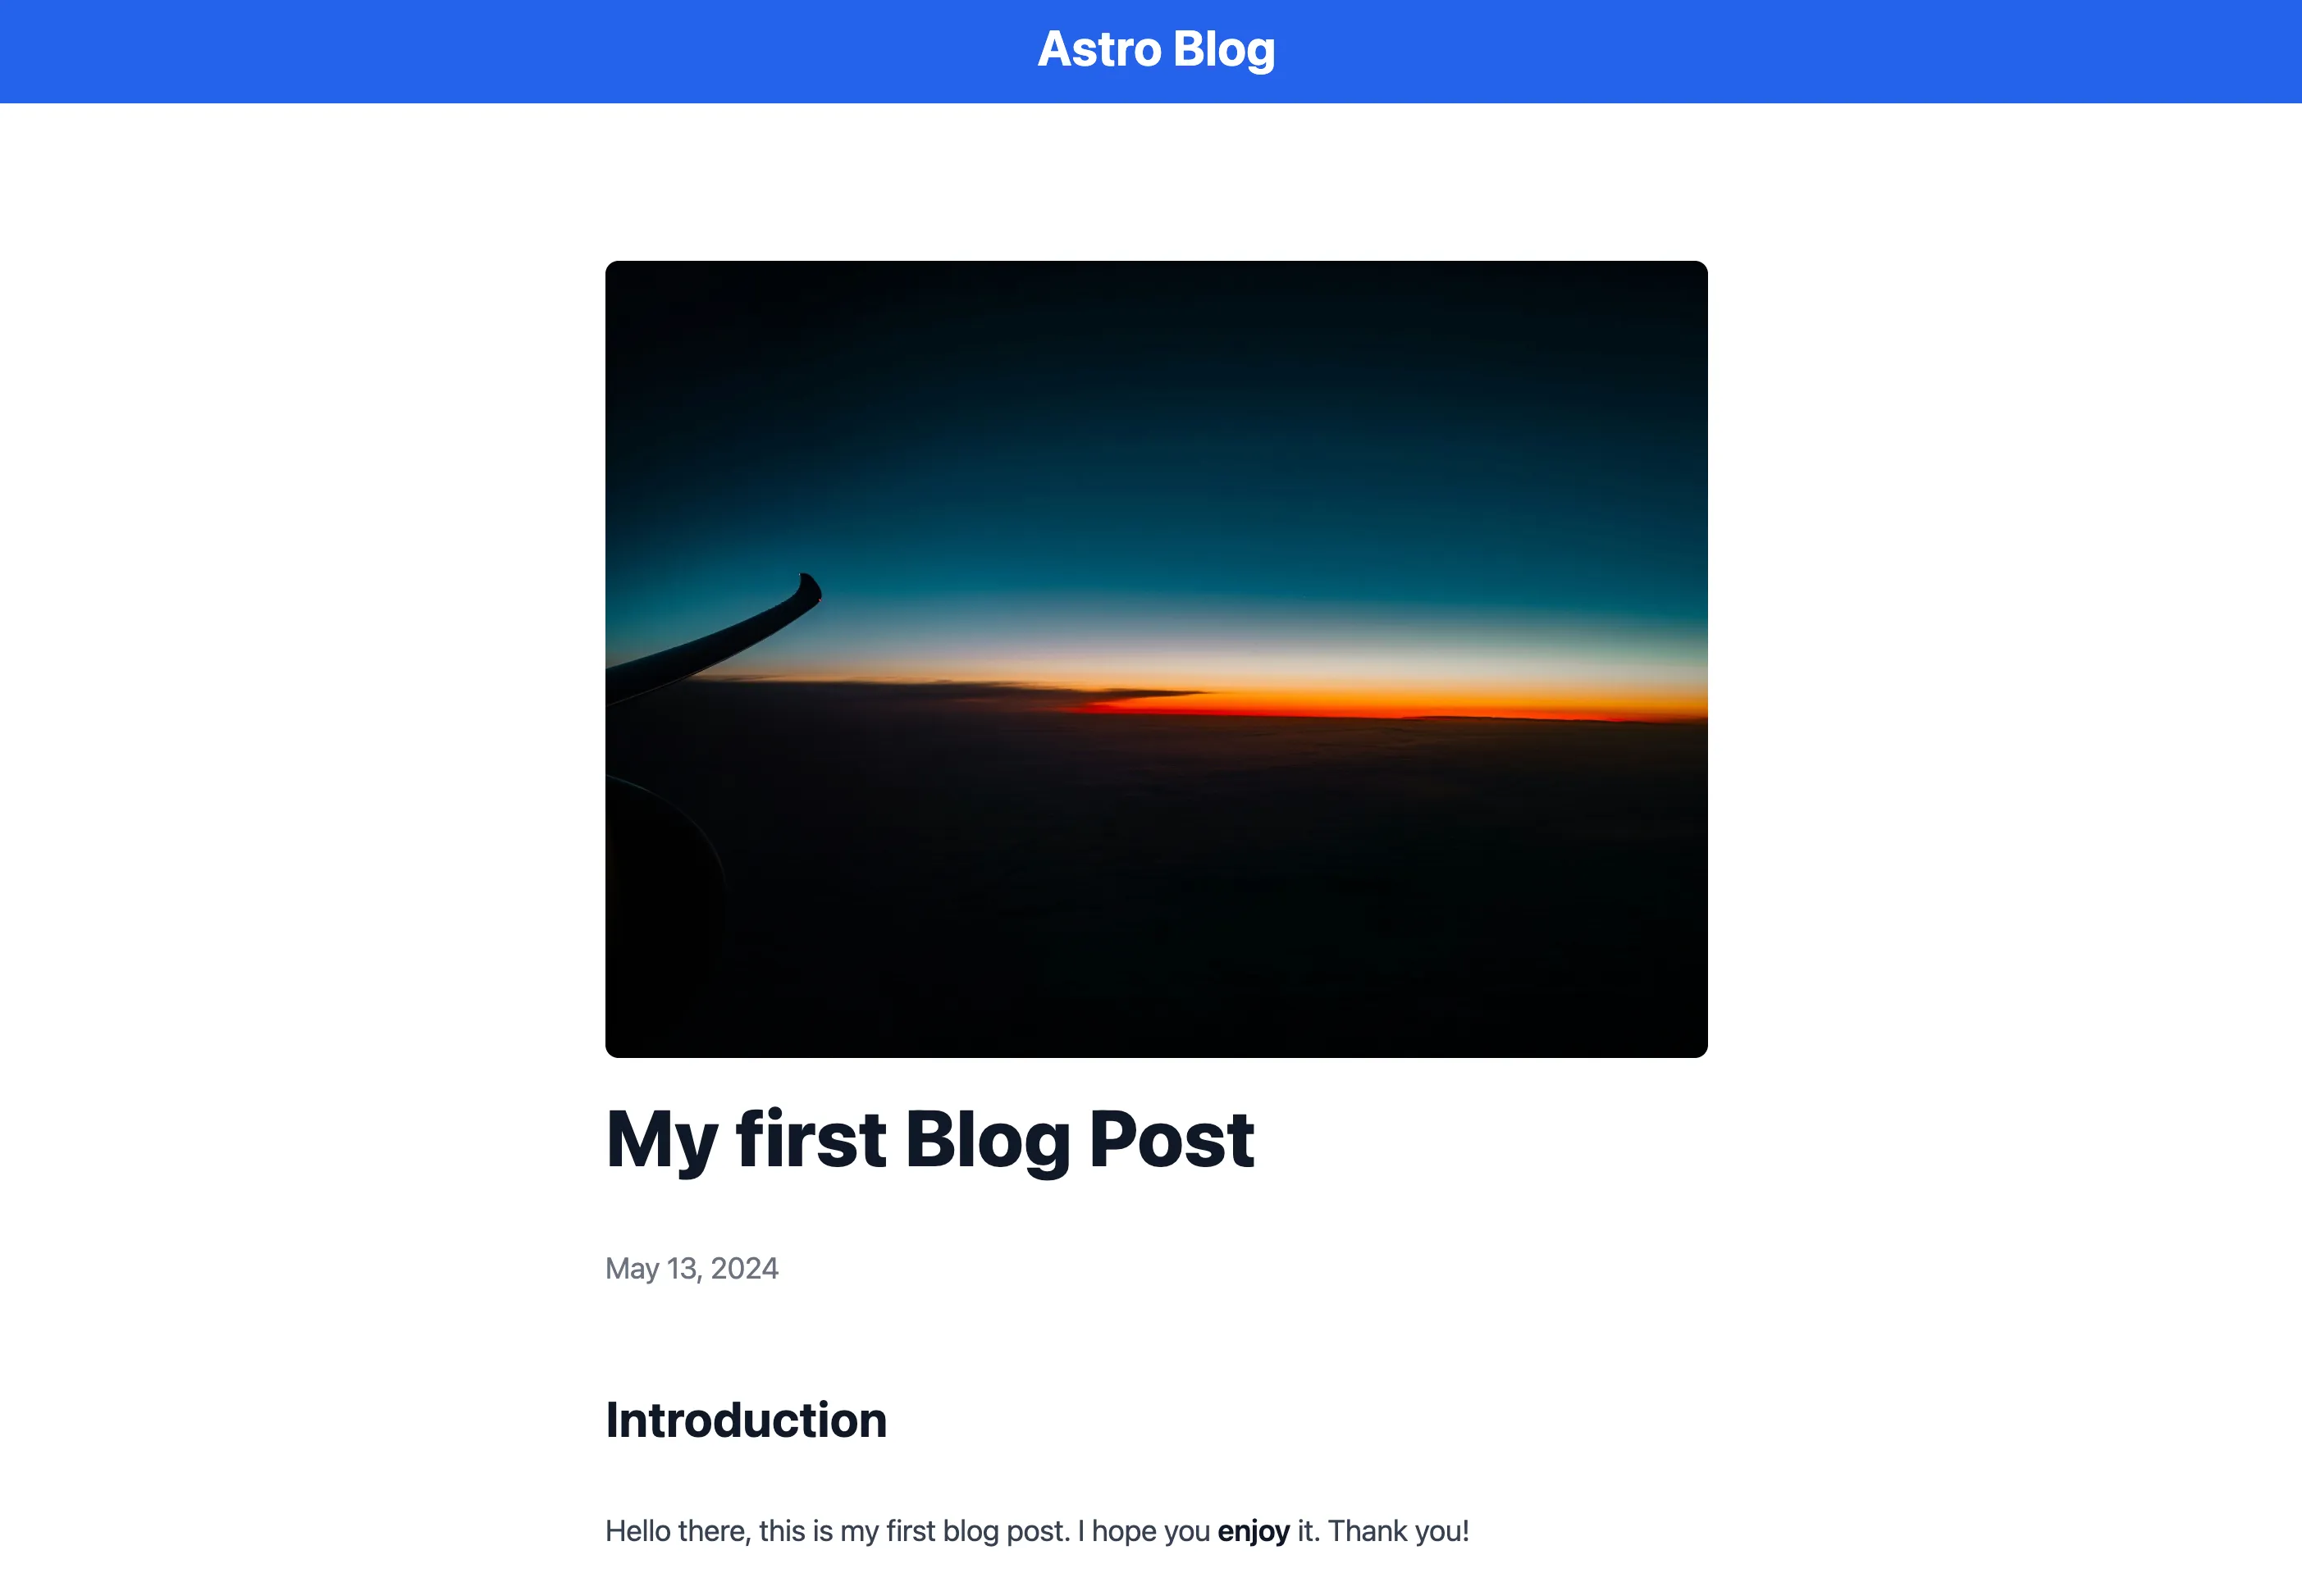
What this does is fetch all posts from our Strapi API. The ?populate=header parameter tells Strapi to include the header image we’ve set for our posts. So Astro now fetches this information and renders a page where we can view the preview for all blog posts.
Go and check it out in your browser. When you add a new post in Strapi, it will automatically show up on this page. You might have noticed that a 404 NOT FOUND error happens whenever you try to click on a blog post preview link. This is because we haven’t created this page yet.
Building the post detail view
So let’s get started with building the post detail view, where we will be able to see the post with all its content.
First, we’ll need to install the marked library, which will convert Strapi’s Markdown into HTML:
npm install marked
Now, create a new file at /src/pages/blog/[slug].astro. This will act as a catch-all for any post. Add the following content to the file:
---
import { marked } from 'marked';
import BlogLayout from '../../layouts/BlogLayout.astro';

export async function getStaticPaths() {
  const response = await fetch(`${import.meta.env.STRAPI_URL}/api/blogs?populate=header`);

  const { data } = await response.json();

  const paths = data.map((post) => {
    return {
      params: { slug: post.attributes.slug },
      props: { post: post.attributes },
    };
  });

  return paths;
}

const { post } = Astro.props;

const headerImage = post.header?.data[0]?.attributes?.url;
const publishDate = new Date(post.published).toLocaleDateString('en-US', {
  year: 'numeric',
  month: 'long',
  day: 'numeric',
});
---

<BlogLayout title={post.title}>
  <article class="prose prose-lg max-w-2xl mx-auto py-24">
    {
      headerImage && (
        <img
          src={`${import.meta.env.STRAPI_URL}${headerImage}`}
          alt={post.title}
          class="mb-6 w-full h-auto rounded-lg"
        />
      )
    }
    <div>
      <h1>{post.title}</h1>
      <p class="text-gray-500">{publishDate}</p>
    </div>
    <div set:html={marked.parse(post.content)} />
  </article>
</BlogLayout>
The getStaticPaths will run at build-time to fetch all blog posts from Strapi. For each blog post, it will then render a page at /blogs/POST-SLUG. We pass each post’s attribute into the site as a prop. From there, we use marked to turn the raw markdown into HTML. The prose prose-xl classes on the <article> tell Tailwind Typography to render it as prose text.
Now we have a working, fully static blog. But so far it’s only in English. Let’s change that by adding Spanish as a second language.
Making it international
Adding Spanish in Strapi
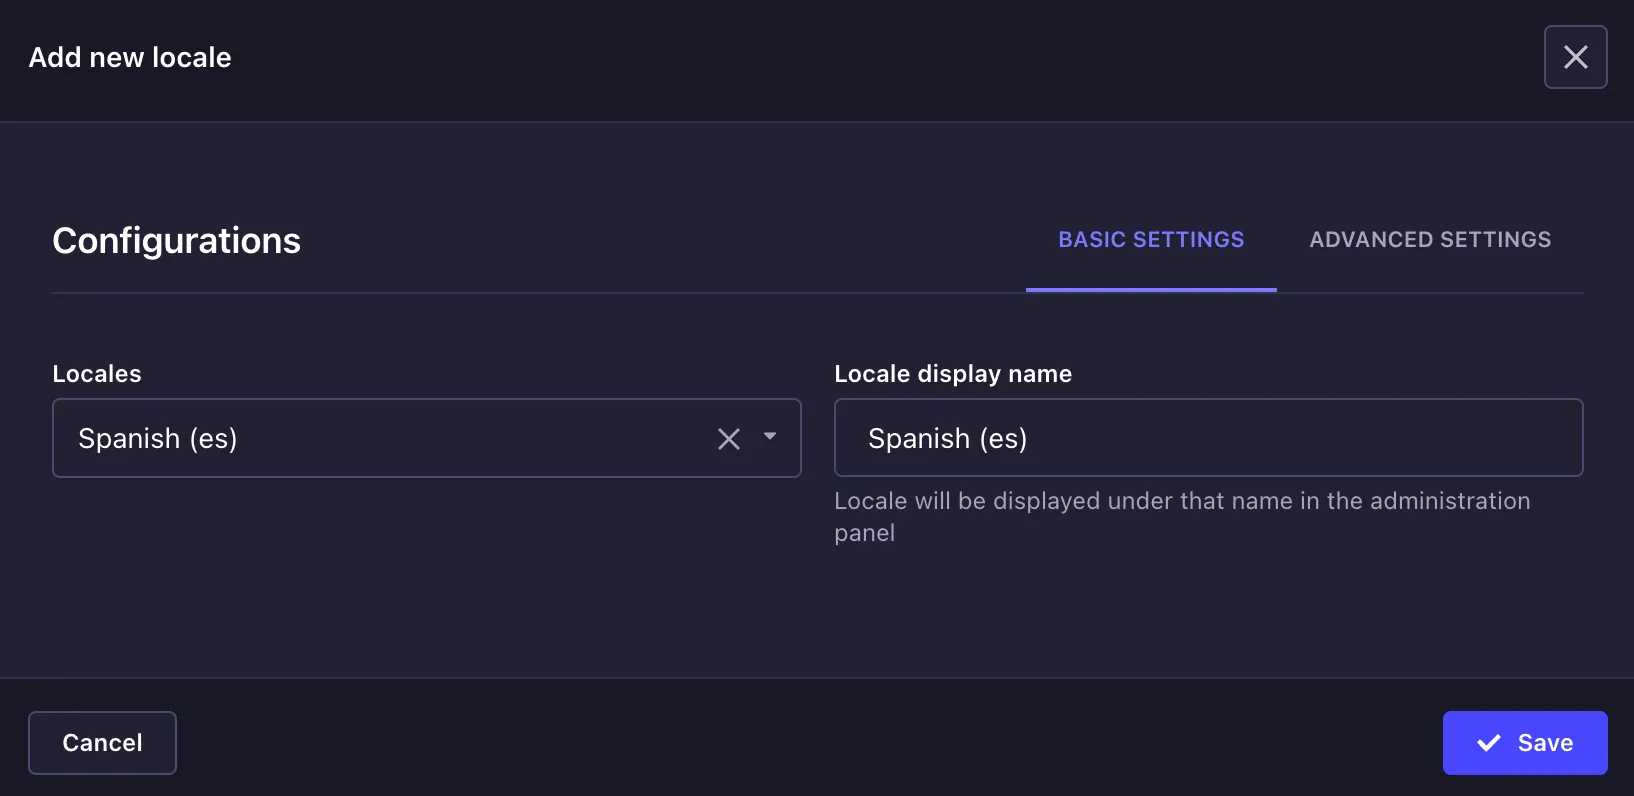
To add Spanish as a locale in Strapi, head over to Settings, Internationalization and click Add new locale.

Add Spanish, or any other language you like! Then, click Save.
Now head back over into the Content Manager, select the blog post(s) you’ve already created. You will now see a second language option in the Locales dropdown.
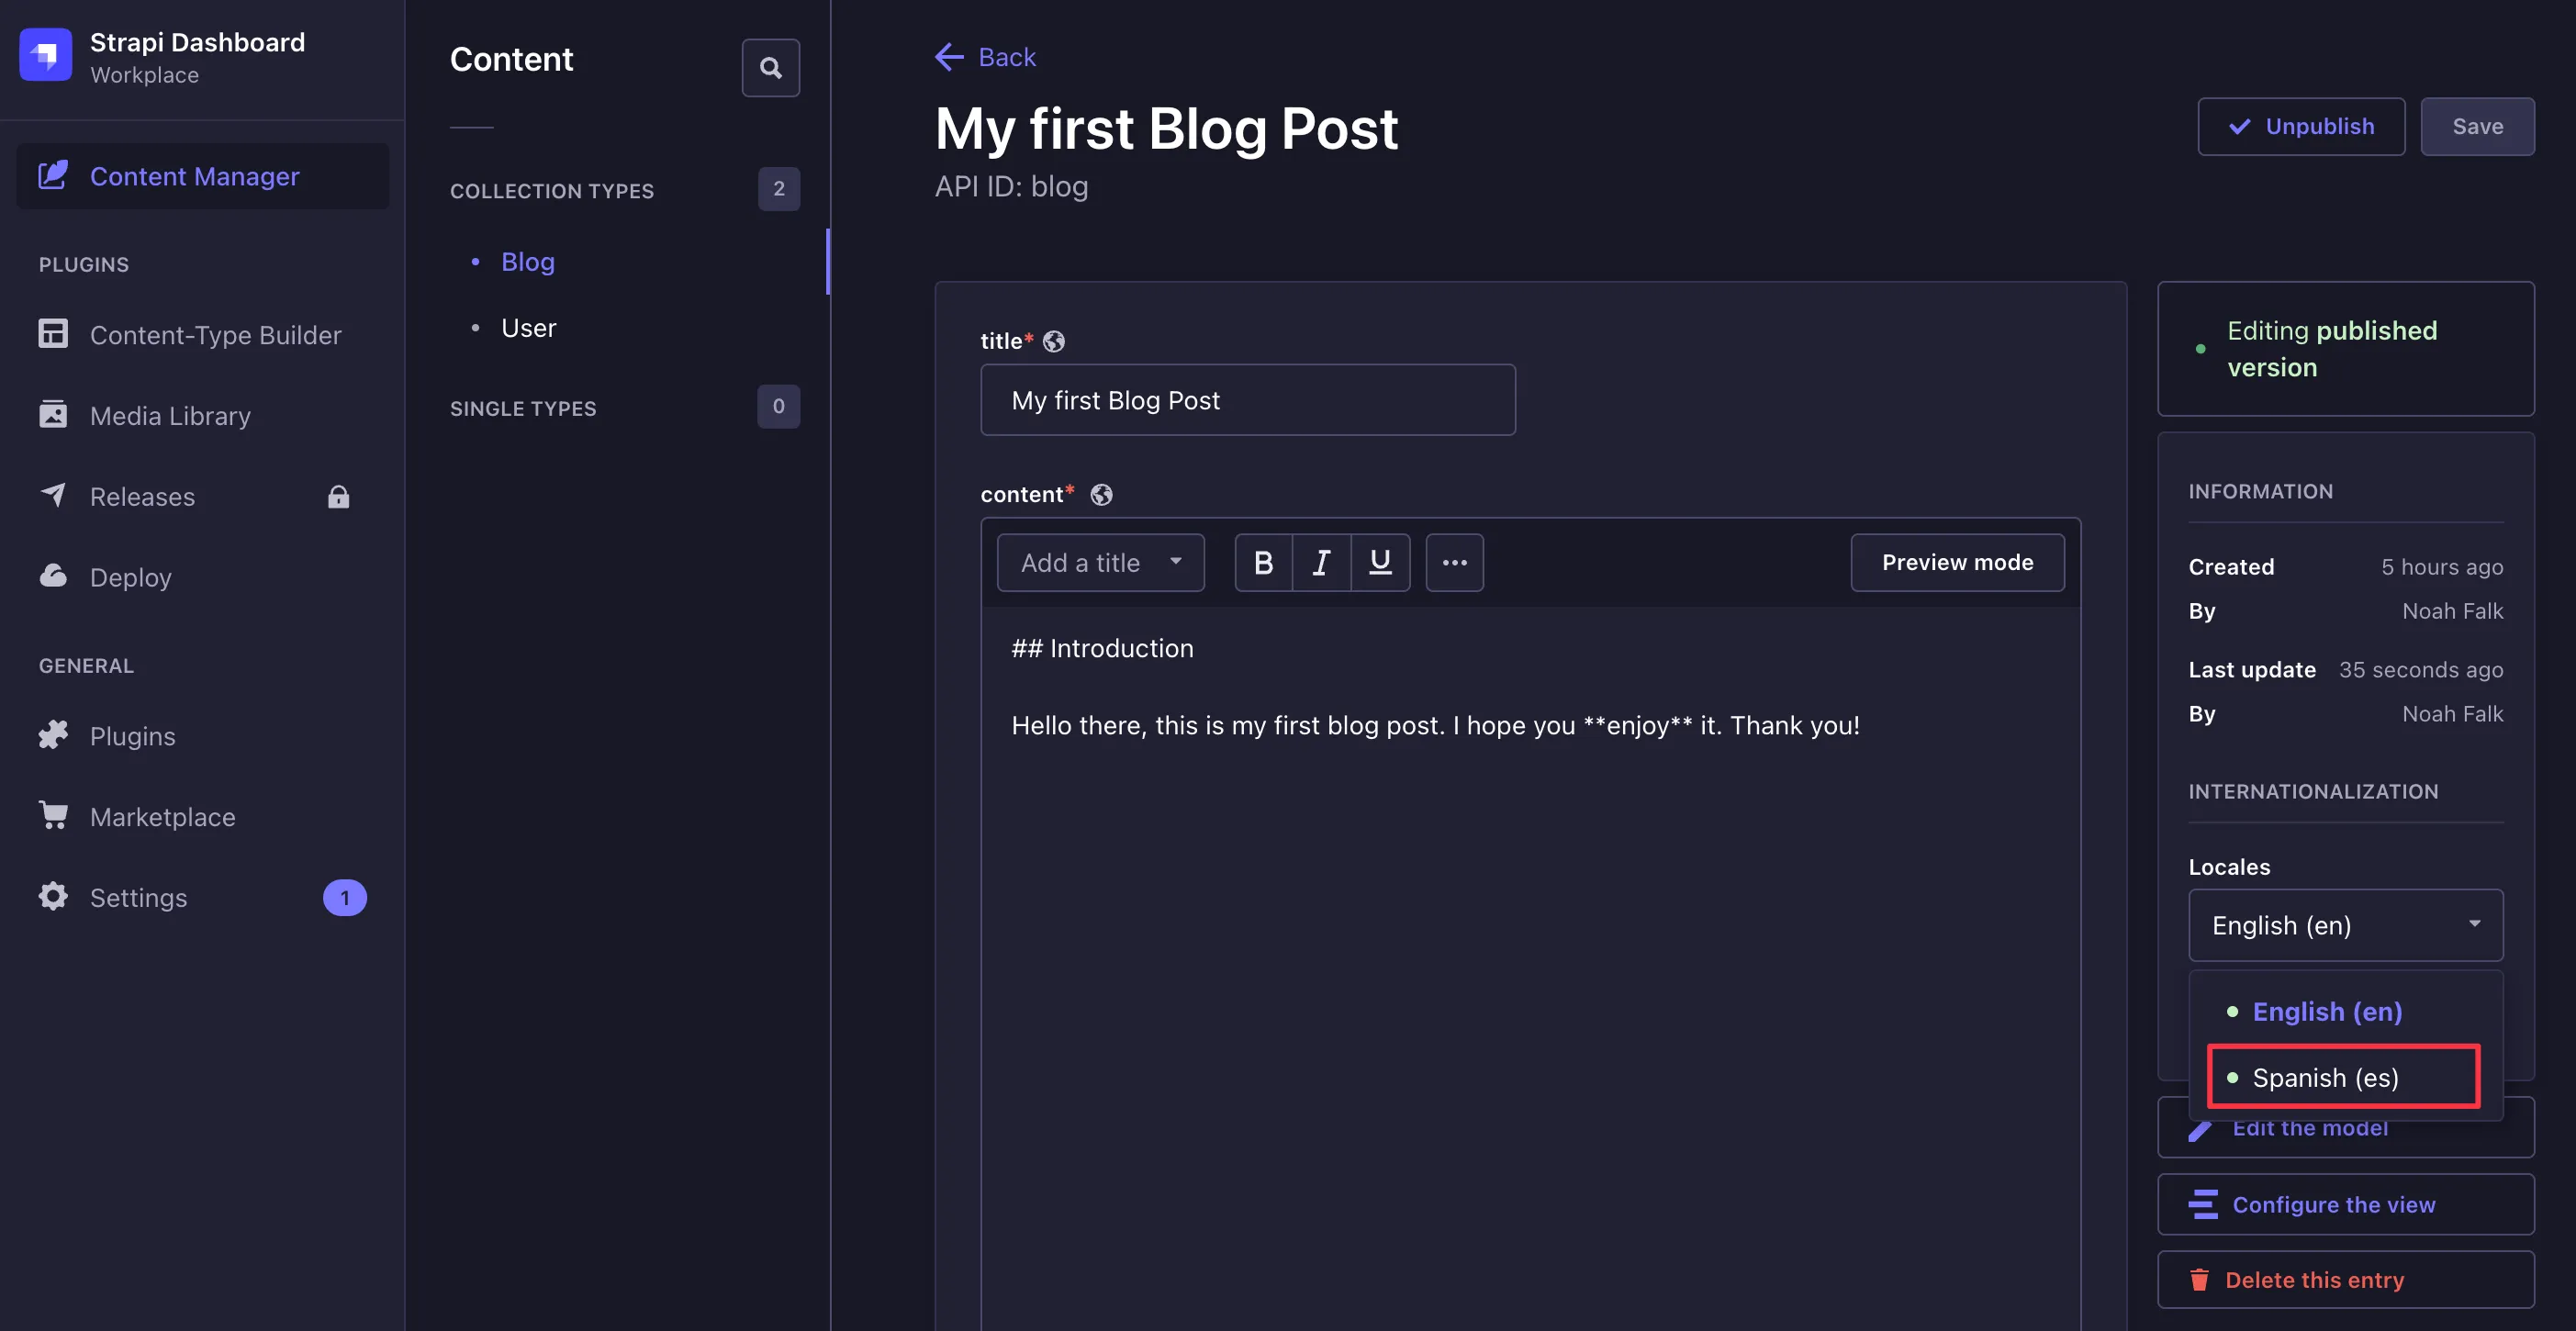
Select the Spanish (es) option and translate your post. Once translated, you can Save and Publish the post again.
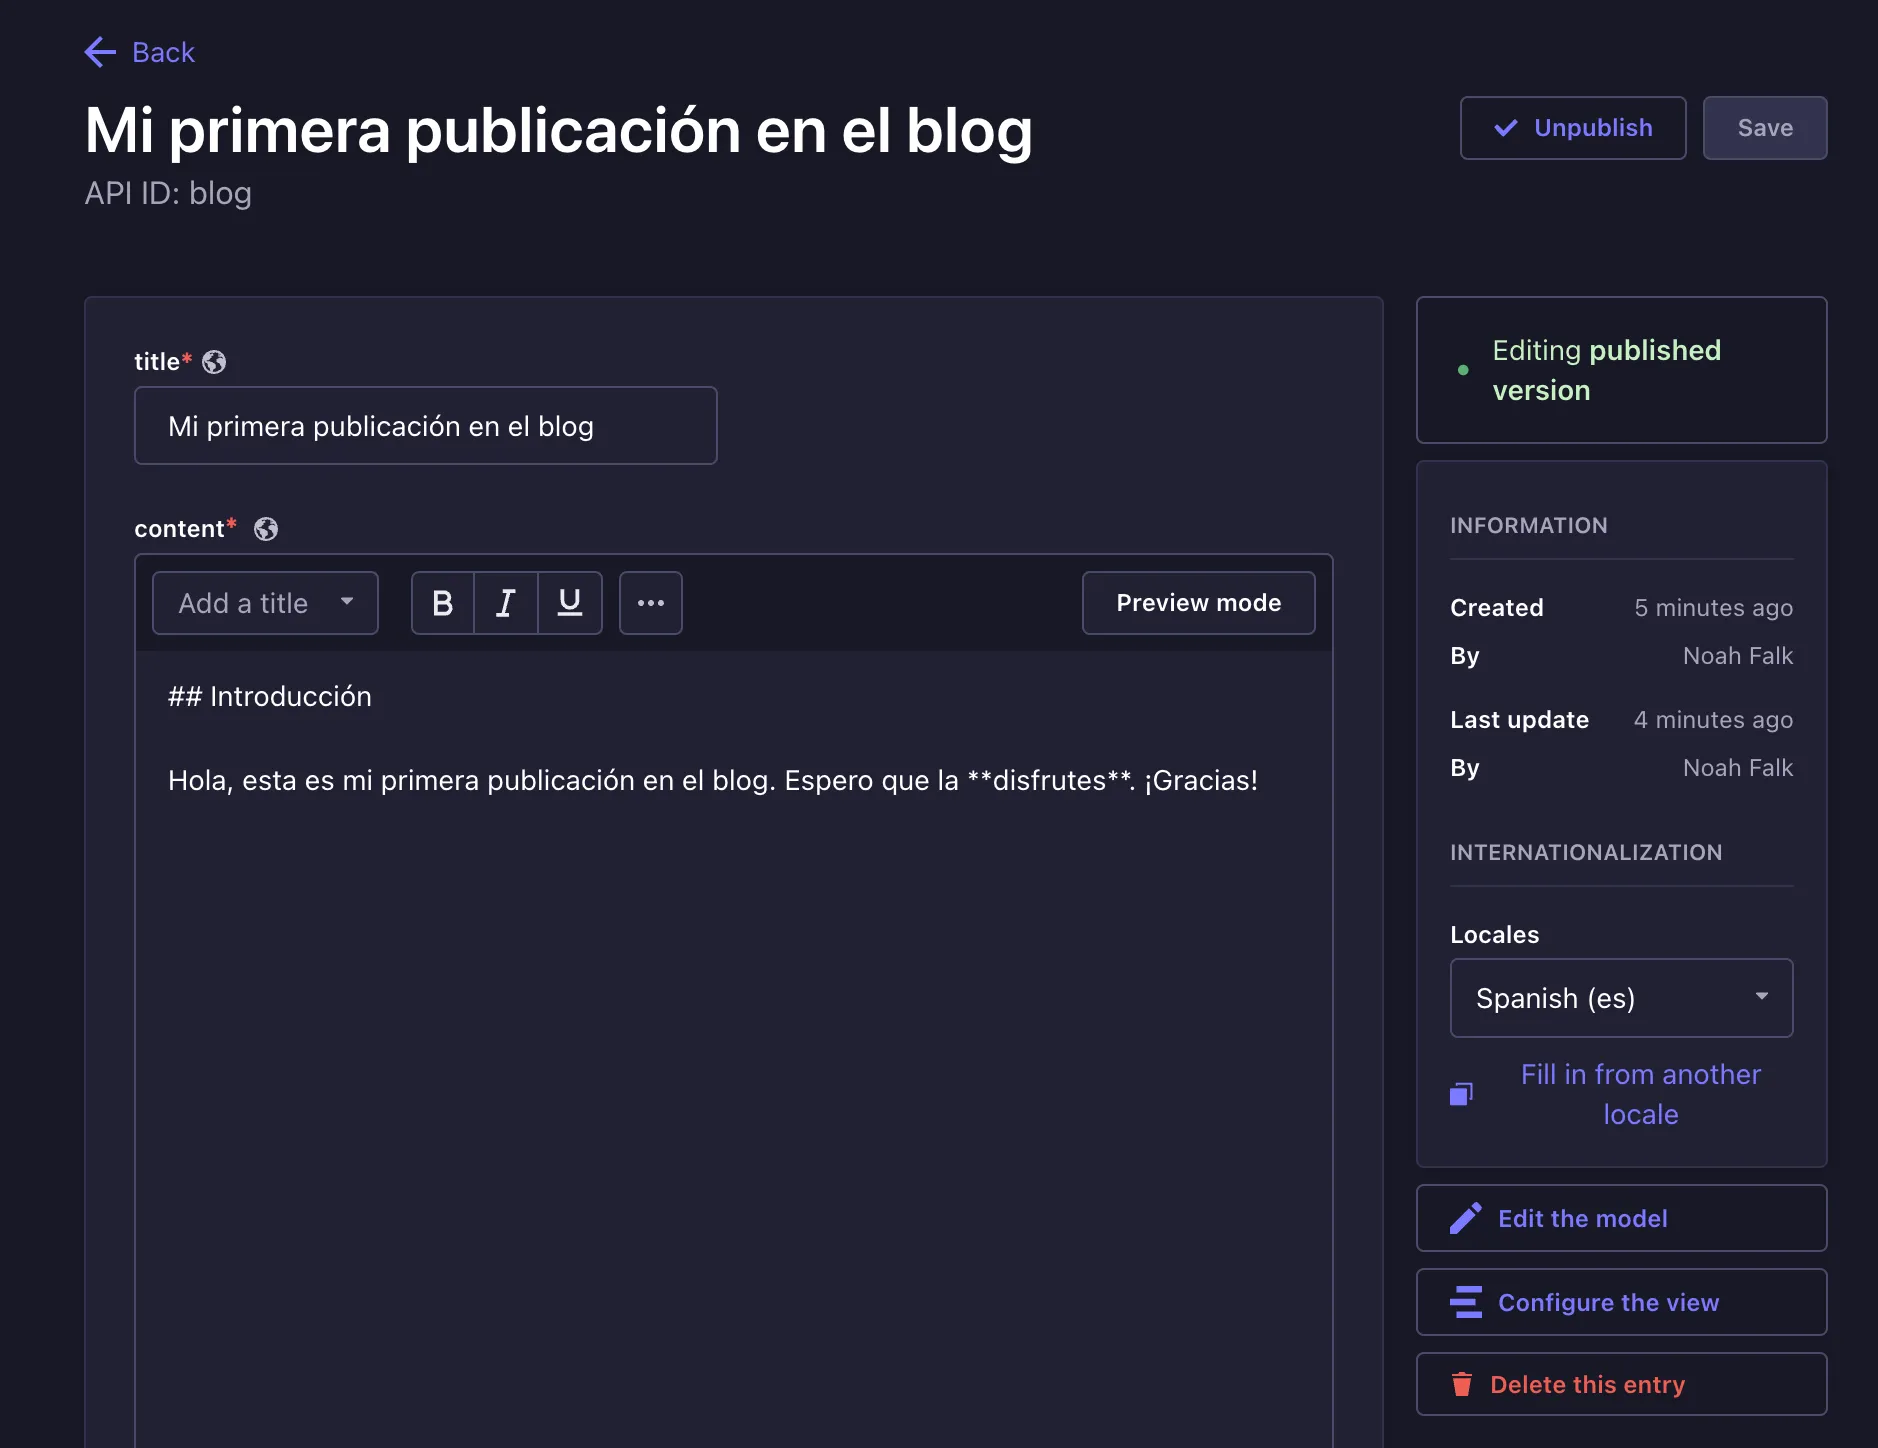
If you now look at the API at http://localhost:1337/api/blogs?populate=* again, you will see a new localizations field that contains the translation of your post. Let’s head back over to Astro to actually show this on the web.
Rendering posts in multiple languages
Back in Astro, open astro.config.mjs and add the locale configuration:
import { defineConfig } from 'astro/config';

import tailwind from '@astrojs/tailwind';

// https://astro.build/config
export default defineConfig({
  integrations: [tailwind()],
  i18n: {
    defaultLocale: 'en',
    locales: ['en', 'es'],
  },
});
This will automatically determine the preferred locale set in the user’s browser.
Now create a new file at /src/pages/es/blog/index.astro for our Spanish all posts site. Add the following content:
---
import BlogLayout from '../../../layouts/BlogLayout.astro';

const response = await fetch(`${import.meta.env.STRAPI_URL}/api/blogs?populate=header,localizations`);
const data = await response.json();
const posts = data.data;
---

<BlogLayout title="Todas las Publicaciones">
  <main class="container mx-auto mt-8 px-4">
    <div class="space-y-6 max-w-lg mx-auto">
      {
        posts.map((post) => {
          const localized = post.attributes.localizations.data.find((l) => l.attributes.locale === 'es');

          const headerImageUrl = post.attributes.header?.data[0]?.attributes?.formats?.small?.url;

          return (
            <a
              href={`/es/blog/${localized.attributes.slug}`}
              class="block bg-white rounded-lg shadow-md overflow-hidden hover:shadow-lg transition-shadow duration-300 max-w-md mx-auto"
            >
              {headerImageUrl && (
                <img
                  src={`${import.meta.env.STRAPI_URL}${headerImageUrl}`}
                  alt="Article Header Image"
                  class="w-full h-48 object-cover"
                />
              )}
              <div class="p-4">
                <h2 class="text-xl font-bold mb-2">{localized.attributes.title}</h2>
                <p class="text-gray-600 text-sm">
                  Publicado el: {new Date(localized.attributes.publishedAt).toLocaleDateString()}
                </p>
              </div>
            </a>
          );
        })
      }
    </div>
  </main>
</BlogLayout>
This does virtually the same thing as our English all posts page. It simply takes the Strapi content from the localizations field.
Create a new file at /src/pages/es/blog/[slug].astro for rendering the Spanish posts. We’ll use the same strategy:
---
import { marked } from 'marked';
import BlogLayout from '../../../layouts/BlogLayout.astro';

export async function getStaticPaths() {
  const response = await fetch(`${import.meta.env.STRAPI_URL}/api/blogs?populate=header,localizations`);
  const { data } = await response.json();

  const paths = data.flatMap((post) => {
    const localizedPaths = post.attributes.localizations.data.map((localization) => {
      return {
        params: { slug: localization.attributes.slug },
        props: { post: localization.attributes, header: post.attributes.header },
      };
    });
    return localizedPaths;
  });

  return paths;
}

const { post, header } = Astro.props;

const headerImage = header?.data?.[0]?.attributes?.url;
const publishDate = new Date(post.publishedAt).toLocaleDateString('es-ES', {
  year: 'numeric',
  month: 'long',
  day: 'numeric',
});
---

<BlogLayout title={post.title}>
  <article class="prose prose-lg max-w-2xl mx-auto py-24">
    {
      headerImage && (
        <img
          src={`${import.meta.env.STRAPI_URL}${headerImage}`}
          alt={post.title}
          class="mb-6 w-full h-auto rounded-lg"
        />
      )
    }
    <div>
      <h1>{post.title}</h1>
      <p class="text-gray-500">{publishDate}</p>
    </div>
    <div set:html={marked.parse(post.content)} />
  </article>
</BlogLayout>
Again, this is very similar to what we did in the English version, just with a different locale.
Adding a language switcher
Astro will automatically redirect users to their preferred language according to what they’ve set in the browser. However, we also want to give users the choice to manually switch languages. For this, let’s add a little switcher to our shared Header. This is the updated BlogLayout.astro component:
---
import Layout from './Layout.astro';
const { title, otherSlug } = Astro.props;
const currentLocale = Astro.currentLocale || 'en';
const getSwitchUrl = () => {
if (!otherSlug) {
return currentLocale === 'es' ? '/blog' : '/es/blog';
}
if (currentLocale === 'en') {
return `/es/blog/${otherSlug}`;
}
return `/blog/${otherSlug}`;
};
const switchUrl = getSwitchUrl();
---
<Layout title={title}>
<header class="bg-blue-600 text-white text-center py-4">
<h1 class="text-3xl font-bold">
<a href="/blog" class="text-white"> Astro Blog </a>
</h1>
<nav class="mt-2">
<a href={switchUrl} class="text-white underline">
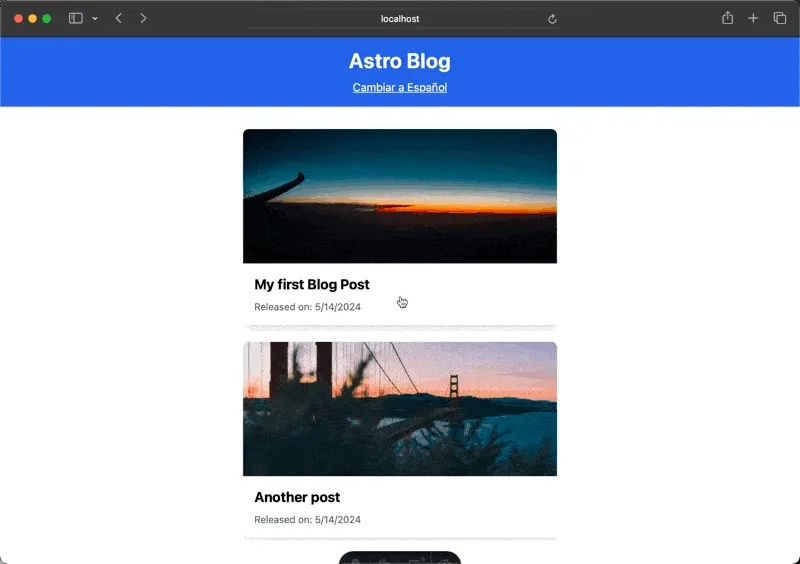
{currentLocale === 'es' ? 'Switch to English' : 'Cambiar a Español'}
</a>
</nav>
</header>
<slot />
</Layout>
Since Spanish and English articles have different blog slug names, we need to know the slug of the alternative language. So we’re passing this in as a prop. If we are on the “All Posts” page, we do not have to pass it down. Instead, we’ll just redirect to either /blog or /es/blog.
Then, we check what’s the current language using Astro.currentLocale and offer a link to switch to the alternative language.
Now we need to make sure the alternative slug gets passed down for blog detail views in both languages. First, let’s look at the English version. That’s the file at /src/pages/blog/[slug].astro:
---
import { marked } from 'marked';
import BlogLayout from '../../layouts/BlogLayout.astro';

export async function getStaticPaths() {
  const response = await fetch(`${import.meta.env.STRAPI_URL}/api/blogs?populate=header,localizations`);

  const { data } = await response.json();

  const paths = data.map((post) => {
    const localized = post.attributes.localizations.data.find((l) => l.attributes.locale === 'es');

    return {
      params: { slug: post.attributes.slug },
      props: { post: post.attributes, otherSlug: localized.attributes.slug },
    };
  });

  return paths;
}

const { post, otherSlug } = Astro.props as any;

const headerImage = post.header?.data[0]?.attributes?.url;
const publishDate = new Date(post.published).toLocaleDateString('en-US', {
  year: 'numeric',
  month: 'long',
  day: 'numeric',
});
---

<BlogLayout title={post.title} otherSlug={otherSlug}>
  <article class="prose prose-lg max-w-2xl mx-auto py-24">
    {
      headerImage && (
        <img
          src={`${import.meta.env.STRAPI_URL}${headerImage}`}
          alt={post.title}
          class="mb-6 w-full h-auto rounded-lg"
        />
      )
    }
    <div>
      <h1>{post.title}</h1>
      <p class="text-gray-500">{publishDate}</p>
    </div>
    <div set:html={marked.parse(post.content)} />
  </article>
</BlogLayout>
For each post, we’re looking at the slug of the Spanish version and passing it down to the component as a prop called otherSlug. This prop, in turn, then gets passed to the BlogLayout component, which handles the language switching.
Now let’s look at the Spanish version in /src/pages/es/blog/[slug].astro:
---
import { marked } from 'marked';
import BlogLayout from '../../../layouts/BlogLayout.astro';

export async function getStaticPaths() {
  const response = await fetch(`${import.meta.env.STRAPI_URL}/api/blogs?populate=header,localizations`);
  const { data } = await response.json();

  const paths = data.flatMap((post) => {
    const localizedPaths = post.attributes.localizations.data.map((localization) => {
      return {
        params: { slug: localization.attributes.slug },
        props: { post: localization.attributes, header: post.attributes.header, otherSlug: post.attributes.slug },
      };
    });
    return localizedPaths;
  });

  return paths;
}

const { post, header, otherSlug } = Astro.props as any;

const headerImage = header?.data?.[0]?.attributes?.url;
const publishDate = new Date(post.publishedAt).toLocaleDateString('es-ES', {
  year: 'numeric',
  month: 'long',
  day: 'numeric',
});
---

<BlogLayout title={post.title} otherSlug={otherSlug}>
  <article class="prose prose-lg max-w-2xl mx-auto py-24">
    {
      headerImage && (
        <img
          src={`${import.meta.env.STRAPI_URL}${headerImage}`}
          alt={post.title}
          class="mb-6 w-full h-auto rounded-lg"
        />
      )
    }
    <div>
      <h1>{post.title}</h1>
      <p class="text-gray-500">{publishDate}</p>
    </div>
    <div set:html={marked.parse(post.content)} />
  </article>
</BlogLayout>
This component handles things a little differently. Since English is our default language, it uses attributes.slug. So there’s no need to locate it within the localizations.
Conclusion
In this tutorial, we’ve covered how you can build a multi-language blog with Strapi and Astro. It allows users to seamlessly switch between languages. And thanks to Astro, the website is fast and does not ship any JavaScript. Strapi’s multi-language support made it easy for us to convert our content into multiple languages and display it on the client through the powerful API.
You can find the complete code in this GitHub repository. To learn more about building websites with Strapi and Astro, check out their respective documentation.